HackRF One · Volume 5
HackRF One Volume 5 — Host Tooling (`hackrf_*` CLI, libhackrf, Python)
The day-to-day driver layer above libhackrf — capture, sweep, debug, automation
5.1 About this Volume
Volume 4 covered firmware. This volume covers everything that runs on the host — the CLI tools shipped with hackrf-tools, the C library every other tool sits on (libhackrf), and the Python bindings that make automation tractable. With these you can capture IQ, sweep spectrum, push test signals out, debug clocking, identify hardware revisions, and integrate the HackRF into shell pipelines.
The order of the chapters follows the natural workflow: install → identify → capture → transmit → sweep → clock → automate.
5.2 Installing on Linux, macOS, Windows
5.2.1 Linux (Debian/Ubuntu/Kali)
sudo apt update
sudo apt install hackrf libhackrf-dev libhackrf0
sudo usermod -aG plugdev $USER     # if not already
# log out and back in, or newgrp plugdev

# Verify
hackrf_info
The Debian package ships udev rules at /lib/udev/rules.d/53-hackrf.rules that grant access to the plugdev group. If you built from source (Vol 4 §6), copy the rule file:
sudo cp host/libhackrf/53-hackrf.rules /etc/udev/rules.d/
sudo udevadm control --reload-rules
sudo udevadm trigger
5.2.2 macOS
brew install hackrf
hackrf_info
Homebrew handles libhackrf as a dependency. macOS is the friendliest platform for casual HackRF work — drivers and permissions just work.
5.2.3 Windows
Two paths, both annoying:
WSL2 (recommended): Install Ubuntu under WSL2, install usbipd-win on the Windows host, attach the HackRF to WSL2’s usbipd. Then proceed as Linux. Adds 30 ms of latency vs native but otherwise indistinguishable.
Native Windows: Install Zadig^[https://zadig.akeo.ie/], replace the default Windows USB driver for the HackRF with WinUSB. Then download hackrf-tools Windows binaries from the GSG releases page. Tedious; updates require redoing Zadig.
Most serious HackRF users on Windows either dual-boot Linux for the actual radio work, or use WSL2 + usbipd-win. The whiteSHADOW1234 guide^[https://github.com/whiteSHADOW1234/HackRF-One-for-Windows] is the most readable Windows walk-through if you must go native.
5.3 Identification — hackrf_info
The first command run on a new bench setup:
$ hackrf_info
hackrf_info version: 2026.01.1
libhackrf version: 0.9 (2026.01.1)
Found HackRF
Index: 0
Serial number: 0000000000000000457863c834a45c0f
Board ID Number: 2 (HackRF One)
Firmware Version: 2026.01.1
Part ID Number: 0xa000cb3c 0x004f4747
Hardware Revision: r4
What each field tells you:
Table 1 — What each field tells you
| Field | Meaning |
|---|---|
hackrf_info version | Version of the CLI tool (matches host package) |
libhackrf version | Underlying library version |
Index | Multi-device index (0, 1, 2, …) |
Serial number | LPC4320 part-unique ID (32 hex digits, two 64-bit halves concatenated) |
Board ID Number | 0=Jellybean, 1=Jawbreaker, 2=HackRF One, 3=rad1o, 4=HackRF Pro |
Firmware Version | What’s running on LPC4320 right now |
Part ID Number | LPC4320 silicon ID |
Hardware Revision | r6+ self-reports; r1–r5 reads as “r1”; trust silkscreen for r1–r5 |
If you have multiple HackRFs plugged in, hackrf_info lists each. Many CLI tools accept -d <serial> to target a specific one.
5.4 Capture — hackrf_transfer
The day-to-day capture command:
hackrf_transfer -r capture.cfile \
    -f 433000000 \
    -s 2000000 \
    -g 32 -l 16 -a 1 \
    -n 4000000
Flags:
Table 2 — Flags
| Flag | Meaning |
|---|---|
-r FILE | Receive mode; write IQ samples to FILE |
-t FILE | Transmit mode; read IQ samples from FILE |
-f FREQ | Centre frequency, Hz (here 433 MHz) |
-s RATE | Sample rate, samples per second (here 2 MS/s; max 20 MS/s) |
-b BW | Baseband filter bandwidth (auto-selected from -s if omitted) |
-g GAIN | VGA (post-baseband) gain, 0–62 dB in 2 dB steps |
-l GAIN | LNA (pre-mixer) gain, 0–40 dB in 8 dB steps |
-a 1/-a 0 | RX RF amp on/off (RF preamp; 14 dB nominal; can saturate) |
-p 1/-p 0 | Bias-T enable on antenna port (3.3 V) |
-n SAMPLES | Number of samples (omit for “until Ctrl-C”) |
-x GAIN | TX VGA gain, 0–47 dB in 1 dB steps |
The .cfile extension is convention — it means complex float32 (interleaved I, Q float32 pairs), the native GNU Radio format. hackrf_transfer writes interleaved 8-bit signed I, Q by default; many GNU Radio flowgraphs expect float32 — convert with:
# Convert int8 IQ → float32 IQ (Python one-liner)
python3 -c "
import numpy as np
raw = np.fromfile('capture.cfile', dtype=np.int8)
iq = raw.astype(np.float32) / 127.0
iq.tofile('capture.float32')
"
Or use GNU Radio’s Char to Float block (Vol 6 §4).
5.4.1 Choosing sample rate, bandwidth, and gain
Three coupled choices:
- Sample rate sets the bandwidth captured. At
-s 2000000you see 2 MHz around-f. At-s 20000000you see 20 MHz. - Baseband filter bandwidth (
-b) is set by the MAX2837’s selectable IF filter (1.75/2.5/3.5/5/5.5/6/7/8/9/10/12/14/15/20/24/28 MHz). The firmware picks an appropriate value if-bis omitted; specify only if you want to deliberately roll off below the Nyquist of your sample rate (e.g. capture 2 MS/s with a 1.75 MHz IF filter to get aliasing-free margin). - Gain has three independent stages: RF amp (
-a), LNA (-l, 0–40 in 8 dB steps), VGA (-g, 0–62 in 2 dB steps). Total gain range is ~115 dB. Aim for the noise floor at -50 dBFS in your spectrum view; raise gain until the noise lifts off the bottom, but stop before the strongest signal in band hits 0 dBFS (clipping).
Quick gain heuristic for unknown signals: start -a 0 -l 16 -g 16, capture briefly, look at signal levels, adjust.
5.4.2 Common capture recipes
FM broadcast survey:
hackrf_transfer -r fm.cfile -f 98000000 -s 2000000 -g 16 -l 16 -a 0 -n 4000000ADS-B (1090 MHz, narrow bandwidth):
hackrf_transfer -r adsb.cfile -f 1090000000 -s 2000000 -g 32 -l 32 -a 1 -n 8000000Sub-GHz remote-control (433 MHz ISM):
hackrf_transfer -r remote.cfile -f 433920000 -s 2000000 -g 24 -l 16 -a 0 -n 4000000WiFi/BLE channel observation (2.4 GHz):
hackrf_transfer -r wifi.cfile -f 2412000000 -s 20000000 -g 24 -l 8 -a 0 -n 400000005.5 Transmit — hackrf_transfer -t
The same tool plays back IQ:
hackrf_transfer -t playback.cfile -f 433920000 -s 2000000 -x 30-x is the TX VGA gain, 0–47 dB. Output power scales roughly linearly to ~+10 dBm at -x 47 with no signal compression. Real test signals (modulated, broadband) compress earlier.
Always confirm what you are transmitting and where. A captured commercial signal replayed over the air may violate FCC Part 15 (or your local equivalent) even if the source signal was on a license-free band. Vol 11 covers the legal envelope.
For bench testing into a dummy load (no radiation):
# Replace the antenna with a 50 Ω SMA dummy load
hackrf_transfer -t replay.cfile -f 433920000 -s 2000000 -x 30
# TX power dissipates in the dummy; nothing radiates.
5.6 Spectrum Survey — hackrf_sweep
hackrf_sweep steps the LO across a range and reports FFT power per bin. Output is CSV-friendly:
hackrf_sweep -f 80:1000 -w 100000 -n 8192 -a 0 -l 16 -g 20 -1 \
    > sweep.csv
Flags:
Table 3 — Flags
| Flag | Meaning |
|---|---|
-f LO:HI | Frequency range, MHz |
-w BIN_HZ | Bin width — total bins is roughly (HI-LO)*1e6 / BIN_HZ |
-n FFT | FFT size per step (8192 typical) |
-a/-l/-g | Same gain stages as hackrf_transfer |
-1 | One-shot — sweep once and exit |
-N COUNT | Repeat the sweep COUNT times |
The output CSV has columns: date, time, hz_low, hz_high, hz_bin_width, num_samples, [bin_db ...]. Plotting the result with gnuplot, Python+matplotlib, or pandas gives a usable spectrum picture. With -w 100000, a sweep from 80 to 1000 MHz produces 9200 bins per scan — comparable resolution to a $5000 lab spectrum analyser, with the dynamic-range caveat (8-bit ADC).
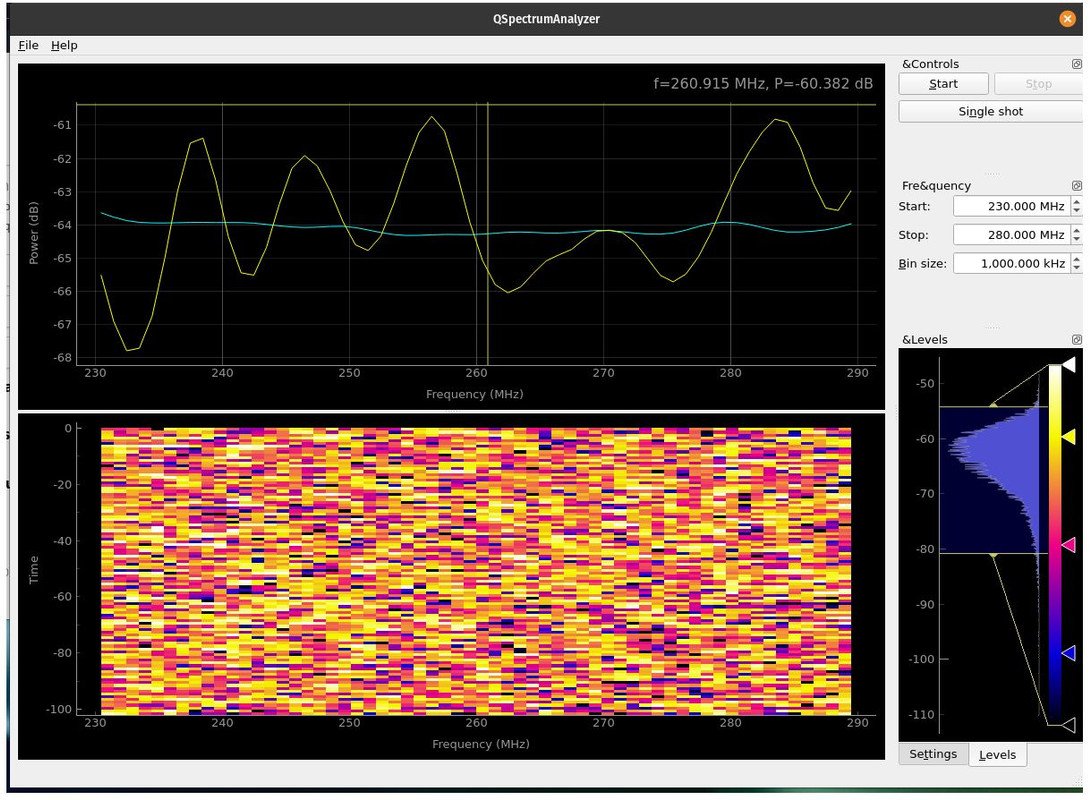
GitHub user pavsa/hackrf-spectrum-analyzer provides a real-time GUI on top of hackrf_sweep — useful for interactive band exploration.
5.7 Clock — hackrf_clock
Three operations:
hackrf_clock -i                 # show current input source (internal/external)
hackrf_clock --set-input-source external
hackrf_clock -o 1               # enable CLKOUT for cascading two devices
For dual-HackRF synchronised work:
- Wire the shared 10 MHz reference (typically a GPSDO) into both HackRFs’ CLKIN ports via a splitter.
- On both HackRFs:
hackrf_clock --set-input-source external. - Verify with
hackrf_info— should now show external clock. - Start both
hackrf_transferinvocations as close to simultaneously as the host’s process scheduler allows.
The synchronisation checklist^[https://hackrf.readthedocs.io/en/latest/synchronization_checklist.html] is the GSG-authoritative reference for fine-tuning two-device coherence.
5.8 Debug — hackrf_debug
A direct-register-access tool for development. Reads/writes specific registers in the MAX2837 / RFFC5072 / Si5351C / CPLD configuration space.
hackrf_debug --max2837 -r 0x05    # read MAX2837 register 5
hackrf_debug --rffc5071 -r 0x0a   # read RFFC5072 register 10 (note: command says 5071, supports 5072)
hackrf_debug --si5351c -n 0       # multisynth setup register dump for output 0
Useful for:
- Diagnosing why a particular gain setting doesn’t behave as expected.
- Verifying CPLD bitstream is loaded.
- Reverse-engineering register-level behaviour the firmware doesn’t expose.
5.9 The libhackrf C API
libhackrf.h exposes ~50 functions; the canonical list lives at host/libhackrf/src/hackrf.h in the repo. A minimal C capture:
#include <libhackrf/hackrf.h>
#include <stdio.h>

int rx_callback(hackrf_transfer *transfer) {
    fwrite(transfer->buffer, transfer->valid_length, 1, stdout);
    return 0;
}

int main() {
    hackrf_init();
    hackrf_device *device = NULL;
    hackrf_open(&device);
    hackrf_set_freq(device, 433920000);
    hackrf_set_sample_rate(device, 2000000);
    hackrf_set_lna_gain(device, 16);
    hackrf_set_vga_gain(device, 32);
    hackrf_start_rx(device, rx_callback, NULL);
    sleep(5);
    hackrf_stop_rx(device);
    hackrf_close(device);
    hackrf_exit();
    return 0;
}
Build: gcc capture.c -o capture -lhackrf.
The library is thread-safe per device handle. Calling sequence is fixed: init() → open() → setters → start_rx() / start_tx() → stop_*() → close() → exit().
5.10 Python — pyhackrf2
For automation, scripting, and notebook-style exploration:
pip install pyhackrf2Equivalent script:
from pyhackrf2 import HackRF

hackrf = HackRF()
hackrf.sample_rate = 2_000_000
hackrf.center_freq = 433_920_000
hackrf.lna_gain = 16
hackrf.vga_gain = 32
samples = hackrf.read_samples(4_000_000)   # returns complex64 NumPy array
hackrf.close()

# samples is now ready for SciPy / NumPy DSP work
import numpy as np
power_db = 20 * np.log10(np.abs(np.fft.fftshift(np.fft.fft(samples[:8192]))))pyhackrf2^[https://pypi.org/project/pyhackrf2/] is the active fork of pyhackrf and works against libhackrf 0.7+. It returns NumPy complex64 arrays directly, ready for scientific computing.
5.11 Common Workflows
5.11.1 Capture-and-decode pipeline
# 1. Spot the signal
hackrf_sweep -f 430:440 -w 50000 -1 > sweep.csv
# (visualise sweep.csv; identify a peak at 433.92 MHz)

# 2. Capture
hackrf_transfer -r capture.cfile -f 433920000 -s 2000000 -g 24 -l 16 -n 4000000

# 3. Inspect / decode
inspectrum capture.cfile      # waterfall + cursor analysis (Vol 7 §5)
# OR
urh capture.cfile             # protocol structure (Vol 7 §3)
# OR
gnuradio-companion my_decoder.grc    # custom flowgraph (Vol 6)
5.11.2 Continuous sweep dashboard
# In one terminal — feed sweep into a fifo
mkfifo /tmp/sweep
hackrf_sweep -f 100:6000 -w 1000000 -N 999999 > /tmp/sweep &

# In another terminal — read fifo, update a dashboard
python3 dashboard.py /tmp/sweep
# (your script reads CSV rows, plots in matplotlib FuncAnimation)
5.11.3 Periodic capture cron job
# Every hour, capture 30s of 433 MHz, archive
0 * * * * /usr/local/bin/hackrf_transfer \
    -r /var/log/rf/$(date +\%Y\%m\%d_\%H).cfile \
    -f 433920000 -s 2000000 -g 24 -l 16 -n 60000000
5.12 Cheatsheet Updates from this Volume
For Vol 12:
hackrf_info— first command on every fresh setuphackrf_transfer -r FILE -f FREQ -s RATE -g VGA -l LNA -a AMP -n Nhackrf_transfer -t FILE -f FREQ -s RATE -x TX_VGAhackrf_sweep -f LO:HI -w BIN -n FFT -1hackrf_clock -i(status),--set-input-source external(use CLKIN)hackrf_spiflash -R(reset to DFU),-w FILE(flash firmware)hackrf_cpldjtag -x default.xsvf(CPLD reflash)- Gain stages: amp (0/14 dB), LNA (0–40 in 8 dB), VGA (0–62 in 2 dB)
- Default file format: int8 IQ interleaved (NOT float32 — GNU Radio’s
.cfileconvention is float32)
5.13 Resources
Table 4 — 13. Resources
| Resource | URL |
|---|---|
| HackRF Tools (GSG docs) | https://hackrf.readthedocs.io/en/latest/hackrf_tools.html |
| Sampling rate and baseband filters | https://hackrf.readthedocs.io/en/latest/sampling_rate.html |
| Setting gain controls for RX | https://hackrf.readthedocs.io/en/latest/setting_gain.html |
| libhackrf header (API reference) | https://github.com/greatscottgadgets/hackrf/blob/main/host/libhackrf/src/hackrf.h |
| pyhackrf2 (Python bindings) | https://pypi.org/project/pyhackrf2/ |
| Synchronisation checklist | https://hackrf.readthedocs.io/en/latest/synchronization_checklist.html |
| External clock interface | https://hackrf.readthedocs.io/en/latest/external_clock_interface.html |
| pavsa/hackrf-spectrum-analyzer GUI | https://github.com/pavsa/hackrf-spectrum-analyzer |
| Zadig (Windows USB driver setup) | https://zadig.akeo.ie/ |
| usbipd-win (USB to WSL2) | https://github.com/dorssel/usbipd-win |
Comments (0)