Parrot OS · Volume 4
Parrot OS Volume 4 — Installation Walkthrough
Back up Windows, shrink the partition, write the USB stick, run the installer, verify the dual boot
4.1 The pre-install checklist
Before any keys are pressed, work through this list. Each item prevents a category of “I bricked my laptop” that is annoying to fix.
Table 1 — 1. The pre-install checklist {#pre-install-checklist}
| Step | Status |
|---|---|
| 1. Vol 2 § 3 hardware modifications complete (RAM, NVMe). Strongly recommended to do these before installing Parrot — saves repartitioning later. | ☐ |
| 2. BitLocker recovery key backed up (Vol 3 § 3.2). Written down on paper. Stored in two places. | ☐ |
3. Windows recovery USB created (Create a recovery drive in Windows search, 16 GB+ USB). Tested by booting it once. | ☐ |
4. Windows fully updated. Run Settings > Windows Update > Check for updates until it reports no pending updates. | ☐ |
| 5. Critical Windows data backed up to external media or cloud. The dual-boot install should not touch Windows, but “should” is not “will.” | ☐ |
| 6. T480 connected to AC power. Battery > 30% as a fallback. Mid-install power loss is recoverable but messy. | ☐ |
| 7. BIOS configured per Vol 2 § 4 (Secure Boot enabled, CSM disabled, UEFI Only, VT-x + VT-d enabled, USB UEFI Boot Support enabled). | ☐ |
| 8. BIOS supervisor password set (Vol 2 § 4). | ☐ |
| 9. Ethernet cable on hand (some installer steps want network access; Wi-Fi works too, but Ethernet is more reliable mid-install). | ☐ |
| 10. Empty USB stick (16+ GB) for the Parrot installer; a separate stick (16+ GB) for the Windows recovery USB. Do not reuse the same stick. | ☐ |
| 11. Time set aside: 2-3 hours for a smooth install, 4-5 hours including the BitLocker decrypt-and-shrink cycle if going the slow-safe route. | ☐ |
4.2 Downloading and verifying the Parrot ISO
4.2.1 The official download
Go to https://www.parrotsec.org/download/. Select:
- Edition: Security Edition.
- Desktop: MATE.
- Architecture: amd64 (Intel x86_64).
- Download method: HTTPS direct or torrent. Torrent is usually faster.
File name pattern: Parrot-security-6.3_amd64.iso (or whatever the current 6.x point release is). Size: ~5 GB.
4.2.2 SHA-256 sum verification
On the download page, copy the published SHA-256 hash next to the ISO. Then on Windows in an elevated PowerShell:
Get-FileHash -Algorithm SHA256 .\Parrot-security-6.3_amd64.isoOr on Linux:
sha256sum Parrot-security-6.3_amd64.isoCompare byte-for-byte. If the hashes don’t match, do not use the ISO. A non-matching hash indicates either a corrupted download or a tampered file. Re-download from a different mirror.
4.2.3 GPG signature verification (stronger)
The Parrot team publishes a GPG-signed SHA256SUMS.gpg file alongside the ISO. Verifying the GPG signature confirms the SHA-256 hash file was authored by the Parrot team, not by an MITM. The procedure on Linux:
# Import the Parrot signing key from their keyserver
gpg --keyserver hkps://keyserver.ubuntu.com --recv-keys 1B5DCF3AB30D6FD1
# (key ID changes over time; check parrotsec.org/docs/signing-keys/ for current)

# Verify the SHA256SUMS file's signature
gpg --verify SHA256SUMS.gpg SHA256SUMS

# If signature passes, verify the ISO's hash from SHA256SUMS
sha256sum -c SHA256SUMS --ignore-missing
Good signature + matching hash = trustworthy ISO.
4.3 Writing the install USB — Ventoy, Rufus, dd
Three options, ranked by recommendation.
4.3.1 Ventoy (recommended)
Ventoy is a small bootloader that turns a USB stick into a multi-ISO carrier. You install Ventoy once on the stick, then drop ISO files onto the stick like ordinary files — at boot, Ventoy presents a menu of all ISOs on the drive. Genuinely the best UX.
Why Ventoy: One 32 GB or 64 GB USB stick now holds Parrot + Kali + a Windows recovery + Tails + Clonezilla + memtest86. No reformatting between distros. The stick remains usable as plain storage for the unused 90% of capacity.
Install:
- Download Ventoy from https://www.ventoy.net/. Versions for Windows and Linux.
- Run
Ventoy2Disk.exe(Windows) orVentoy2Disk.sh(Linux). Select the target USB stick. Confirm. Ventoy formats the stick (creates two partitions: one for itself, one for ISOs). - After Ventoy install, drag-and-drop the
Parrot-security-6.3_amd64.isoonto the stick’s first (larger) partition. - Eject cleanly.
To boot: F12 at T480 power-on → select the USB stick → Ventoy menu appears → arrow-key to Parrot ISO → Enter.
4.3.2 Rufus (Windows-native, single ISO)
If only Parrot is needed on the stick:
- Download Rufus from https://rufus.ie/.
- Insert USB stick.
- Run Rufus. Device = the USB stick. Boot selection = “SELECT” → choose the Parrot ISO. Partition scheme = GPT. Target system = UEFI (non-CSM).
- Click START. Rufus prompts about ISO mode vs DD mode — for Parrot, ISO mode works fine and gives a writable USB. DD mode is read-only but more faithful to the ISO layout.
- Wait ~5-10 minutes.
4.3.3 dd (Linux, command-line)
If another Linux machine is available:
# Identify the USB stick (CAREFUL — wrong device = data loss)
lsblk

# Unmount any auto-mounted partitions
sudo umount /dev/sdX*

# Write the ISO (sdX is the USB stick, NOT a partition)
sudo dd if=/path/to/Parrot-security-6.3_amd64.iso of=/dev/sdX bs=4M status=progress oflag=sync
sync
oflag=sync flushes writes immediately — no silent buffering. status=progress shows live throughput.
4.4 Shrinking Windows and creating free space
This step happens before booting the Parrot installer. Windows can shrink its own partition more reliably than third-party tools can.
4.4.1 Suspend BitLocker first
From elevated PowerShell:
manage-bde -protectors -disable C:
manage-bde -status
Protection Status should report Protection Off. BitLocker is now suspended but not decrypted — operations on the partition won’t trigger TPM rebind.
4.4.2 Shrink the C: partition
Open Disk Management: Win+X → Disk Management (or run diskmgmt.msc).
-
Right-click the C: partition → “Shrink Volume…”
-
Wait while Windows calculates available shrink space (can take minutes on a near-full disk).
-
Windows reports the maximum shrinkable size. Caveat: Windows can only shrink to where the last “unmovable” file lives. Sometimes this is just a few GB free. If Windows says “you can only shrink by 5 GB” on a 990 GB partition, you need to defragment unmovable files first.
Unmovable-file culprits:
pagefile.sys(swap) — temporarily disable: System Properties → Advanced → Performance Settings → Advanced → Virtual Memory → No paging file. Reboot. Re-shrink.hiberfil.sys(hibernate) — disable: elevated PowerShellpowercfg /h off. Re-shrink.- System Restore points — disable: System Properties → System Protection → Configure → Disable system protection. Re-shrink. Re-enable after install.
- Volume Shadow Copies —
vssadmin delete shadows /all /quiet. - Fast Startup — disable: Control Panel → Power Options → Choose what the power buttons do → Change settings currently unavailable → uncheck Turn on fast startup.
-
After clearing unmovables and rebooting, re-attempt Shrink Volume. Now the “Enter the amount of space to shrink in MB” field should report ~570 GB available.
-
Enter the shrink amount in MB. For the Vol 3 § 5.2 plan (400 GB Windows + 570 GB Parrot), shrink by 590000 MB (590 GB) — gives Parrot 590 GB to work with after some slack.
-
Click Shrink. Windows performs the operation in 1-5 minutes. C: is now ~400 GB; “Unallocated” 570 GB sits to the right.
4.4.3 Sanity-check the partition layout
In Disk Management, the disk should now look like:
[EFI 100 MB] [MSR 16 MB] [C: NTFS 400 GB] [Unallocated 570 GB] [Recovery 600 MB](The recovery partition usually stays at the end of the disk; it doesn’t matter for Parrot install.)
Power down Windows fully (Shift+Click Restart → it actually shuts down rather than hibernating — Fast Startup, even disabled, can leave a hybrid-shutdown state otherwise).
4.5 Booting the live USB and launching the installer
-
Insert the Ventoy USB.
-
Power on T480. Tap F12 repeatedly.
-
Boot Menu appears. Select the USB stick (typically listed as the brand of the stick — “USB HDD: SanDisk Cruzer…” etc.). Enter.
-
Ventoy menu appears. Arrow to
Parrot-security-6.3_amd64.iso. Enter. -
Ventoy boot mode menu: “Boot in normal mode.” Enter.
-
GRUB-style menu from the Parrot ISO appears:
- Try / Install Parrot Security
- Try / Install with Free Drivers
- Failsafe
- Forensic Mode
- RAM Mode
Choose Try / Install Parrot Security. (You’ll launch the installer from inside the live desktop.)
-
The Parrot live system boots. After 30-60 seconds the MATE desktop appears with a parrot-blue wallpaper.
4.5.1 Quick live-environment health check
Before launching the installer, verify the basics from the live desktop:
# Open a terminal: MATE menu → System Tools → Terminator (or Ctrl+Alt+T)

# Network connectivity (Ethernet should auto-DHCP if plugged in)
ip a
ping -c 2 8.8.8.8

# Display correctly identified
xrandr

# Storage correctly enumerated
lsblk

# Wi-Fi card present
lspci -k | grep -A2 -i wireless
If lsblk doesn’t show the NVMe drive, something is wrong with the BIOS storage config — F1 → Storage → check that the NVMe drive is listed.
4.6 Calamares walkthrough — every screen
Double-click the Install Parrot icon on the desktop (or MATE menu → System → Install Parrot). Calamares — the modern Linux distro installer — launches. Eight screens.
4.6.1 Welcome
Language selection. Choose English (US) or per preference. Click Next.
4.6.2 Region
Time zone selection on a world map. Click your region. Click Next.
4.6.3 Keyboard
Keyboard layout. “English (US)” default; “English (US, intl., with dead keys)” if you want easy accent input.
Test the keyboard in the test field below. Click Next.
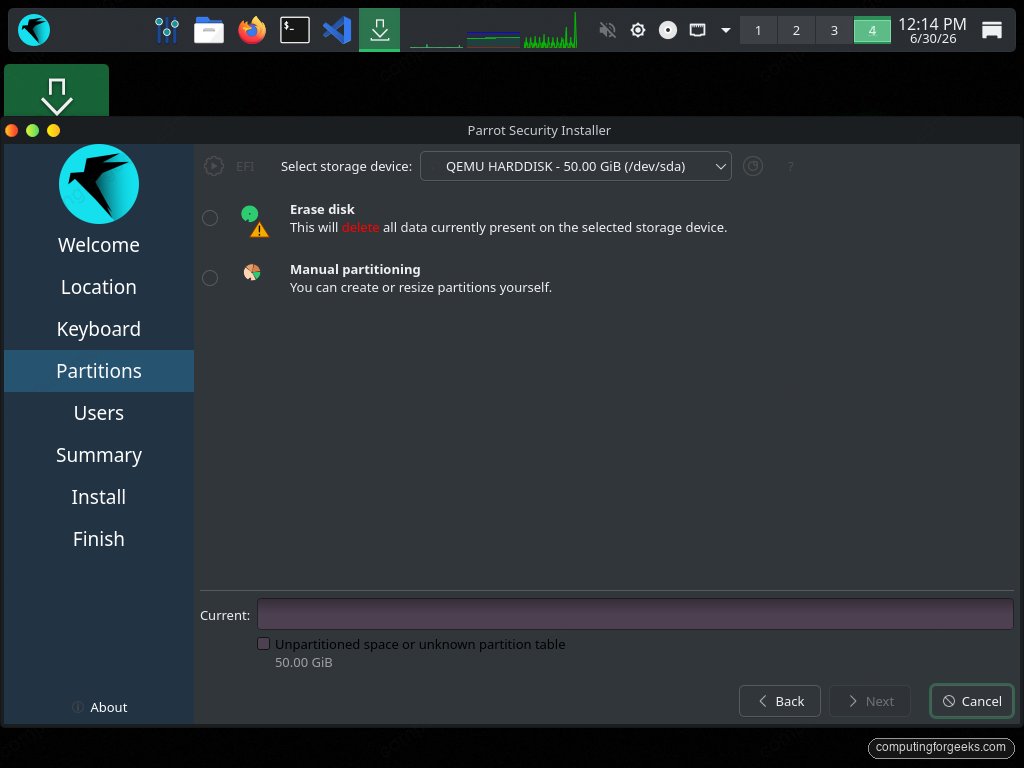
4.6.4 Partitions
The most important screen. Calamares offers four modes:
Table 2 — The most important screen. Calamares offers four modes
| Mode | What it does | When to use |
|---|---|---|
| Erase disk | Wipe entire disk, single Parrot partition. | Don’t — destroys Windows. |
| Replace a partition | Replace an existing partition with Parrot. | Useful if you want to overwrite a specific Linux partition. |
| Manual partitioning | Full control. | This is the right choice for the dual-boot layout. |
| Install alongside | Auto-create Parrot partitions in the unallocated space. | Works for Vol 3 § 5.2 layout if you trust Calamares to choose ext4 + no encryption. Use Manual for the LUKS + LVM layout. |
Choose Manual partitioning. Click Next.
4.6.4.1 Manual partitioning details
The partition editor opens. You see the disk schematic (the disk should show: EFI 100 MB, MSR 16 MB, C: NTFS 400 GB, unallocated 570 GB, Recovery 600 MB).
Step A — grow the ESP (recommended):
- Select the EFI partition (the 100 MB FAT32). Click Edit.
- Change size to 1024 MB (or 500 MB if disk space is tight). Click OK.
Wait — Calamares may not allow this in place if the partition right after it (MSR) prevents it. If not allowed, skip the ESP grow and live with 100 MB (Parrot install will fit, just tight). Plan B: do it post-install with gparted from a live USB.
Step B — create the LUKS partition:
- Select the unallocated 570 GB. Click “Create New Partition.”
- Settings:
- File System: luks
- Encryption passphrase: enter strong passphrase (Vol 3 § 7.3 recommends Diceware 6-7 words)
- Size: leave full (570 GB)
- Mount Point: leave empty (we’ll create LVM inside)
- Click OK.
The unallocated space now becomes nvme0n1p5 (or similar) with the LUKS lock-icon overlay.
Step C — create LVM volume group inside the LUKS container:
The Calamares 3.3+ “LUKS + LVM” preset can be selected at this point via a checkbox on the partition screen. If your Parrot 6.3 Calamares supports it, click “Use LVM on LUKS” and Calamares creates the VG and LVs automatically with sensible defaults (the layout from Vol 3 § 5.2).
If LVM-on-LUKS isn’t auto-offered:
- Open a terminal (Ctrl+Alt+T) without canceling Calamares.
- Manually:
sudo cryptsetup luksOpen /dev/nvme0n1p5 parrot-crypt sudo pvcreate /dev/mapper/parrot-crypt sudo vgcreate parrot /dev/mapper/parrot-crypt sudo lvcreate -L 80G -n parrot-root parrot sudo lvcreate -L 470G -n parrot-home parrot sudo lvcreate -L 16G -n parrot-swap parrot - Back in Calamares, click Refresh on the partition view. The LVs now appear as
/dev/parrot/parrot-root,parrot-home,parrot-swap. - Select
parrot-root. Edit. File system: ext4. Mount point:/. Format: yes. OK. - Select
parrot-home. Edit. ext4. Mount:/home. Format: yes. OK. - Select
parrot-swap. Edit. linuxswap. Mount: (none — auto). Format: yes. OK. - Select the existing ESP (EFI partition). Mount point:
/boot/efi. DO NOT format. (Windows lives in it too.)
Step D — verify the partition plan:
The summary at the top should list:
/dev/nvme0n1p1(EFI) — mount /boot/efi, no format, fat32/dev/nvme0n1p3(Windows) — untouched/dev/parrot/parrot-root— format ext4, mount //dev/parrot/parrot-home— format ext4, mount /home/dev/parrot/parrot-swap— format swap
Critical: confirm Windows partition is marked “Keep” and “Do not format.” If anywhere it says “Format” against the NTFS partition, STOP — that erases Windows.
Click Next.
4.6.5 Users
- Your Name: preferred display name (e.g., your real name)
- Login Name: preferred username (e.g.,
useror a handle). Used as both the home directory name and the username. - Hostname:
parrot-t480(or similar). Avoid spaces; lowercase only. - Password: strong unique password. Used for sudo + login. Not the LUKS passphrase (which was entered earlier).
- “Use the same password for the administrator account”: leave unchecked. Parrot creates a separate root account; you’ll use
sudofrom your user. (Optional: leave checked if you want root login enabled — most users keep it disabled.) - “Log in automatically without password”: leave unchecked. Daily-driver discipline.
Click Next.
4.6.6 Summary
Calamares displays the complete list of operations:
- Mount EFI at /boot/efi
- Create file systems on the LVs
- Install Parrot Security on /dev/parrot/parrot-root
- Install GRUB to /dev/nvme0n1 (the whole disk, not a partition — UEFI installs to the ESP, the device argument is mostly informational here)
- Create user account
Read every line. Confirm none of them say “Erase /dev/nvme0n1p3” (Windows partition).
Click Install.
4.6.7 Install progress
Calamares runs through:
- Mounting partitions.
- Unpacking the squashed root filesystem from the ISO.
- Configuring user accounts, locale, timezone, hostname.
- Installing GRUB to the ESP.
- Running
os-proberto detect Windows. - Updating GRUB config with Windows entry.
- Final cleanup.
Duration on the i5-8250U + NVMe: 15-25 minutes for a typical Parrot Security install.
4.6.8 Finish
Calamares offers “Restart now” — confirm. Remove the USB stick when prompted. T480 reboots.
4.7 First-reboot verification
The T480 POSTs, then GRUB’s blue-themed menu appears:
              Parrot Security GNU/Linux
              Parrot Security GNU/Linux (recovery mode)
              Memory test (memtest86+)
              UEFI Firmware Settings
              Windows Boot Manager (on /dev/nvme0n1p1)
(The exact wording varies slightly. The presence of all five entries is the success signal.)
4.7.1 Boot Parrot first
Enter on Parrot Security. The LUKS prompt appears:
Please unlock disk /dev/nvme0n1p5 (parrot-crypt):Type the LUKS passphrase. Kernel proceeds, MATE desktop login screen appears. Log in.
Quick sanity checks at the first desktop:
# Storage
df -h

# RAM (should be 8 GB or 32 GB depending on upgrade state)
free -h

# Wi-Fi
nmcli device wifi list

# Display
xrandr

# Kernel + Parrot version
uname -r
lsb_release -d

# Verify GRUB found Windows
grep -i windows /boot/grub/grub.cfg
4.7.2 Boot Windows second
Reboot. At GRUB menu, arrow down to “Windows Boot Manager.” Enter.
GRUB chainloads /EFI/Microsoft/Boot/bootmgfw.efi. Windows boots normally.
4.7.3 Re-enable BitLocker
From Windows elevated PowerShell:
manage-bde -protectors -enable C:
manage-bde -status
Protection Status should report Protection On again. The TPM re-binds to the post-install boot configuration (which now includes GRUB) — meaning the next boot, BitLocker won’t trigger recovery mode because the TPM has memorized the new chain.
4.7.4 Restore the page file (if disabled for shrink)
If you disabled the Windows page file in § 4.2 to free up shrinkable space, re-enable it now: System Properties → Advanced → Performance Settings → Advanced → Virtual Memory → System managed size. Reboot.
4.7.5 Confirm the dual-boot works in both directions
Reboot 3-4 times, alternating Parrot and Windows. Verify each boots reliably. If GRUB hangs or Windows BitLockers, fix immediately rather than letting the state drift.
4.8 If something goes wrong — common install failures
4.8.1 “Failed to install GRUB to /dev/nvme0n1”
Calamares post-install error. Usually means the ESP wasn’t mounted at /boot/efi. Boot the live USB again, mount manually, chroot, reinstall (Vol 3 § 8.2 procedure).
4.8.2 “Cannot resize NTFS / NTFS in inconsistent state”
Windows wasn’t shut down cleanly (Fast Startup or hibernate). Boot back into Windows, fully shut down (Shift+Restart), retry.
4.8.3 First boot drops to (initramfs) shell
The LUKS passphrase didn’t match, or the /etc/crypttab UUID is wrong, or the LUKS partition wasn’t detected.
(initramfs) cryptsetup luksOpen /dev/nvme0n1p5 parrot-crypt
(initramfs) vgchange -ay
(initramfs) exit
Boot completes. Then post-boot, fix /etc/crypttab if needed:
sudo blkid /dev/nvme0n1p5     # get UUID
sudo nano /etc/crypttab        # confirm UUID matches
sudo update-initramfs -u -k all
4.8.4 GRUB doesn’t list Windows
os-prober didn’t see Windows. From Parrot:
sudo apt install os-prober
sudo os-prober                 # should print: /dev/nvme0n1p1@/EFI/Microsoft/Boot/bootmgfw.efi:Windows Boot Manager:Windows:efi
# Enable os-prober in /etc/default/grub:
sudo sed -i 's/^#*GRUB_DISABLE_OS_PROBER=.*/GRUB_DISABLE_OS_PROBER=false/' /etc/default/grub
sudo update-grub
If still no Windows entry, manually add to /etc/grub.d/40_custom:
sudo tee -a /etc/grub.d/40_custom <<'EOF'
menuentry "Windows Boot Manager" {
    insmod part_gpt
    insmod fat
    insmod chain
    search --no-floppy --fs-uuid --set=root <ESP-FS-UUID>
    chainloader /EFI/Microsoft/Boot/bootmgfw.efi
}
EOF
sudo update-grub
(Replace <ESP-FS-UUID> with the output of sudo blkid /dev/nvme0n1p1 looking at the UUID= field, not the PARTUUID=.)
4.8.5 BitLocker prompts for recovery key on every Windows boot
The TPM is binding to a boot config that includes GRUB; if GRUB hash changes (after update-grub, after a Parrot kernel update), the TPM rejects, and BitLocker prompts.
Fix: enter the recovery key, log in to Windows, then:
manage-bde -protectors -disable C:
manage-bde -protectors -enable C:
This re-binds the TPM to the current boot chain. Now subsequent Windows boots work without prompting. Re-do this every time update-grub runs on Parrot. A pain — one of the real costs of dual-boot.
(Workarounds: full-decrypt Windows and skip BitLocker — accepts the security loss. Or: install GRUB to a different ESP partition on a different drive — outside the scope of this dual-boot.)
4.8.6 Calamares hangs on “Configuring Windows boot”
Rare. Some Calamares versions have an os-prober bug. Workaround: cancel install, drop to terminal, run sudo killall os-prober, restart install but uncheck “Install bootloader” on the summary screen. Then post-install from live USB: chroot in, grub-install --target=x86_64-efi --efi-directory=/boot/efi --bootloader-id=parrot, update-grub.
4.9 Cheatsheet additions
- Boot menu (T480): F12 at boot.
- BIOS setup: F1 at boot.
- Suspend BitLocker:
manage-bde -protectors -disable C:. - Re-enable BitLocker:
manage-bde -protectors -enable C:. - Verify BitLocker state:
manage-bde -status. - Disable Fast Startup: Control Panel → Power Options → Choose what power buttons do.
- Disable hibernate:
powercfg /h off(Windows). - Disable page file (for shrink): System Properties → Advanced → Performance → Virtual Memory.
- Ventoy: drop ISOs onto the stick.
- Verify ISO SHA-256 (Windows):
Get-FileHash -Algorithm SHA256 file.iso. - Verify ISO SHA-256 (Linux):
sha256sum file.iso. - Force os-prober scan:
sudo os-prober. - Regenerate GRUB config:
sudo update-grub. - Reinstall GRUB to ESP:
sudo grub-install --target=x86_64-efi --efi-directory=/boot/efi --bootloader-id=parrot. - GRUB rescue minimum sequence:
ls,set root=,set prefix=,insmod normal,normal. - LUKS unlock from rescue:
cryptsetup luksOpen /dev/nvme0n1p5 parrot-crypt,vgchange -ay. - Find ESP FS UUID:
sudo blkid /dev/nvme0n1p1.
Comments (0)