Ruckus Game Over · Volume 6
Game Over Module — Volume 6
Operating Workflows
Day-to-day workflows for Game Over: how to actually use the device once firmware is flashed and the board is operational. Three operating modes are covered:
- Standalone — OLED + joystick, no Flipper involved.
- Flipper-bridged — Marauder companion FAP on the Flipper.
- Web-server / SoftAP — phone-or-laptop browser UI.
Plus: daughter-card swap procedure, PCAP capture and retrieval, GPS-fed wardriving (with an external GPS source since Game Over has none built in), and worked examples for the four canonical attacks Game Over is used for.
This volume assumes Marauder firmware (vendor fork or upstream — Vol 3). Ghost ESP and Bruce workflows are similar in shape but differ in menu layout.
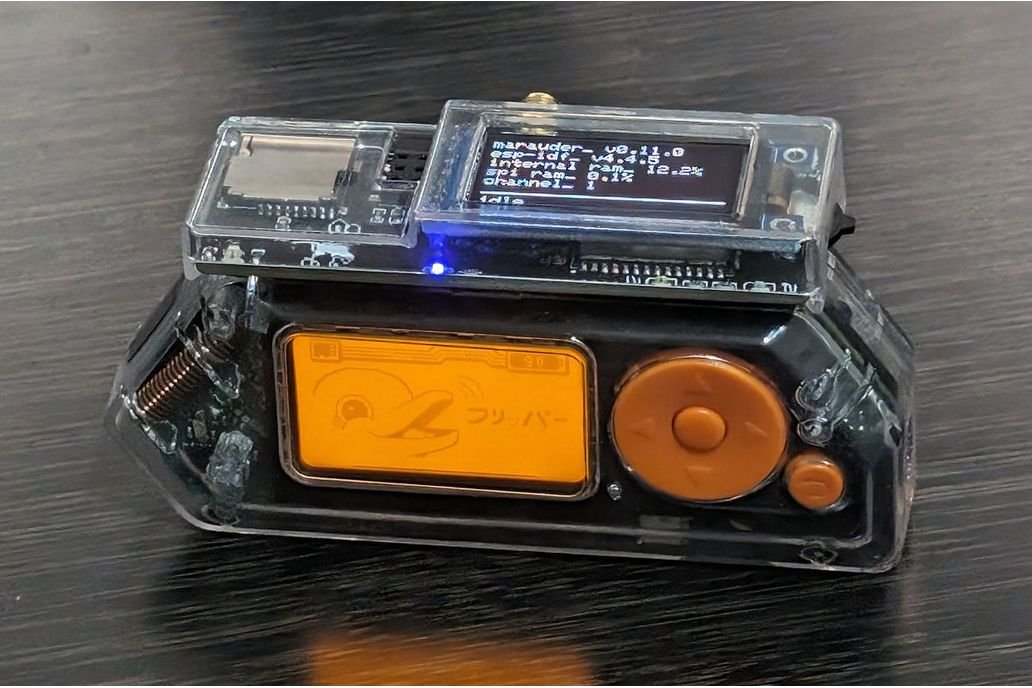
6.1 Mode 1 — Standalone (OLED + joystick)
6.1.1 First boot
Power the board via its own USB-C (recommended) or by mounting on a powered Flipper (use only for short sessions).
Boot sequence:
- ~1 s after power: OLED backlight comes on.
- ~2–3 s: vendor logo / Marauder boot splash.
- ~3–5 s: main menu displayed.
The RGB status LED settles to a steady idle color (usually green or blue depending on firmware version).
6.1.2 Main menu structure (Marauder vendor fork)
Approximate menu hierarchy — exact wording varies by version:
Main Menu
├── Wi-Fi
│   ├── Sniffers
│   │   ├── AP Scan
│   │   ├── Probe Request Sniff
│   │   ├── Beacon Sniff
│   │   ├── Deauth Sniff
│   │   ├── Eapol Sniff (PMKID)
│   │   └── PCAP Capture
│   ├── Attacks
│   │   ├── Beacon Spam (random / pre-defined / SSID list)
│   │   ├── Deauth (target / flood)
│   │   ├── Karma
│   │   └── Evil Portal
│   └── General
│       ├── Channel Hop
│       └── Save Names / Load Names
├── BLE
│   ├── BLE Scan
│   ├── Sour Apple
│   ├── Samsung Buds Spam
│   ├── Microsoft Swift-Pair Spam
│   └── BLE Spam (custom)
├── Sub-GHz  (only if CC1101 daughter installed)
│   ├── Scan
│   ├── Capture
│   └── Replay
├── NRF24    (only if NRF24 daughter installed)
│   ├── Sniff
│   ├── MouseJack Scan
│   └── MouseJack Inject
├── GPS      (works only with external GPS feed)
│   └── GPS Data
├── Settings
│   ├── Display Brightness
│   ├── LED Mode
│   ├── UART Baud
│   ├── Save Path
│   ├── Web Server
│   └── About
└── Reboot
6.1.3 Joystick controls
- UP — scroll up in lists; cancel / back in some submenus.
- DOWN — scroll down.
- PUSH — select / confirm.
- Long-press PUSH — go back / exit current submenu (in most builds).
For text fields (e.g. typing a target SSID), Marauder uses an on-screen letter-by-letter selector — joystick UP/DOWN to pick letter, PUSH to commit. It’s slow but workable.
6.1.4 RGB LED status colors (typical)
- Green — idle, scanning passively.
- Blue — connected to a host (Flipper UART active or Web Server client connected).
- Red — actively transmitting (deauth, BLE spam, beacon spam).
- Yellow — PCAP capture in progress with packets being written.
- Magenta — sub-GHz daughter active.
Vendor fork may differ slightly. Useful for at-a-glance “is the board doing what I think it’s doing” verification.
6.1.5 First-time sanity test
- Wi-Fi → Sniffers → AP Scan. Wait 5 s. Should display a list of visible 2.4 GHz APs in your area with SSID and RSSI.
- BLE → BLE Scan. Should display BLE advertisements (your phone, any BLE-advertising devices nearby).
- Settings → About (or similar). Should show the firmware version string. Note this in your MY_GEAR narrative for the unit.
If all three pass, the board is operational.
6.2 Mode 2 — Flipper-bridged (Marauder companion FAP)
6.2.1 Mount safely
Critical: vendor warns “Do not attach GPIO module’s to a powered on Flipper Zero, as attaching a GPIO module while the flipper is powered on can corrupt your SD card.”
Procedure:
- Power off the Flipper completely (hold BACK + LEFT for 5 s if needed).
- Mount Game Over on the GPIO header. Confirm pin 1 alignment.
- Power on the Flipper.
- Open WiFi Marauder companion FAP (Apps → GPIO → WiFi Marauder).
- The FAP should display the Marauder version banner from Game Over
within 2–3 s. If it shows “No response from ESP”, troubleshoot:
- Check FAP UART baud setting matches Marauder’s (115200 default).
- Confirm Game Over has its own USB-C disconnected (or it’ll compete for power negotiation).
- Re-power the Flipper with Game Over already mounted.
6.2.2 Companion FAP menus
Approximate menu structure on Momentum mntm-012:
WiFi Marauder
├── Send Command
│   ├── scanap
│   ├── sniffraw
│   ├── attack -t deauth
│   ├── ble -s
│   └── ... (full Marauder CLI surface)
├── Save Logs
│   ├── To Flipper SD
│   └── To Game Over SD
├── Settings
│   ├── UART Baud (115200 / 921600)
│   ├── Auto-scroll
│   └── Update ESP32
└── About
The FAP exposes Marauder’s full CLI surface. You can:
- Pick a pre-defined command from a menu.
- Drop into a CLI mode and type Marauder commands directly.
- Save the output to either SD card.
6.2.3 Common bridged-mode workflows
6.2.3.1 Quick AP scan from the Flipper UI
- WiFi Marauder → Send Command → scanap.
- Watch results scroll on the Flipper screen for 30 s.
- PUSH back to abort and see the captured list.
- Save to Flipper SD if you want to keep it.
6.2.3.2 Targeted deauth (lab use only)
- Run scanap to enumerate APs.
- Note the BSSID of your target (your own AP).
- Send Command →
select -i 0 -a ap(select AP index 0). - Send Command →
attack -t deauth. - Use the OLED on Game Over to monitor TX status (red LED, packet count).
- Send Command →
stopscanto halt.
6.2.3.3 BLE spam
- Send Command →
ble -s ms(Microsoft Swift-Pair spam). - Walk around with the Flipper; note nearby Windows devices showing pairing pop-ups. (Lab use only.)
- Send Command →
stopscanto halt.
6.3 Mode 3 — Web-server / SoftAP UI
The Marauder firmware exposes a SoftAP and a web UI for browser-based control. Useful when:
- The OLED is too small for the work.
- You want to upload custom Evil Portal HTML.
- You want a phone-friendly UI without tethering to a Flipper.
6.3.1 Enabling the web server
- Settings → Web Server → Enable (on the OLED).
- Game Over starts a SoftAP. SSID is typically “ESP32 Marauder” or
“GAME OVER”; password defaults documented in the Marauder wiki
(commonly
marauderor per-build). - Connect from a phone or laptop to that SSID.
- Browse to
192.168.4.1(or whatever IP the OLED displays). - The web UI loads — full menu mirroring the OLED, plus an upload form for Evil Portal HTML.
6.3.2 Caveats
- The web server occupies the ESP32-S3’s Wi-Fi radio. While the SoftAP is up, you can’t simultaneously do Wi-Fi attacks on a different network — the chip can’t host AP and operate in monitor mode at the same time.
- Evil Portal HTML uploads go to the SD card (where Marauder serves them from). Confirm SD is mounted before uploading.
- The web UI is HTTP, not HTTPS. Don’t use it on a network where others can sniff your local link.
6.4 Daughter-card swap procedure
Swapping CC1101 ↔ NRF24 (or installing the first daughter) requires care.
6.4.1 The procedure
- Power off everything. Disconnect Game Over from any USB-C, and from the Flipper if mounted. The vendor’s “do not hot-swap” warning applies (Vol 2 § 9).
- Lift the daughter card straight up out of the recessed header. It should come up evenly — if you feel resistance on one side, stop and re-check alignment before forcing.
- Note the orientation marker on the new daughter card. The recessed header is not keyed; you must align manually. The Marauder daughter cards typically have a corner indicator (small triangle or notched edge) that should match the corresponding indicator on the Game Over PCB. Wrong orientation kills NRF24 cards (Vol 7 § 3).
- Insert the new card straight down into the header. Don’t rock side-to-side — that can bend pins.
- Verify seating — the card should sit flush in the recessed slot.
- Power on.
- Verify in firmware — the relevant menu (Sub-GHz for CC1101 / NRF24 for NRF24) should appear. If it doesn’t, the daughter card isn’t being detected — power off and re-check seating.
6.4.2 First-time daughter-card identification
If you bought daughter cards separately and aren’t sure which is which:
- CC1101 daughter typically has a single chip in a 4×4 mm QFN + some surrounding passives + an SMA jack. Often silkscreened “CC1101” on the back.
- NRF24 daughter has a slightly larger ceramic-covered Nordic module (the “rectangular silver can with circuitry visible through the plastic”) + smaller passive set. Often silkscreened “NRF24L01+” on the back.
If silk is unreadable, you can identify by feel — NRF24 daughters are typically a bit thicker due to the module. When in doubt, check the seller’s product page for photos.
6.4.3 Antenna for the daughter card
Match the antenna to the radio:
- CC1101 433 MHz: 433 MHz duck antenna (longer, ~17 cm).
- CC1101 868/915 MHz: 900 MHz duck antenna (~9 cm).
- NRF24L01+: 2.4 GHz duck antenna (~3–5 cm) — often integrated into the daughter card itself as a PCB trace.
Wrong antenna won’t damage the radio at low power but will severely reduce range. Don’t use a 2.4 GHz antenna on a 433 MHz CC1101 unless you don’t care about range.
6.5 PCAP capture (the headline storage feature)
6.5.1 What gets captured
Marauder’s PCAP capture writes raw 802.11 frames to a .pcap file on
the microSD card. The capture is full-frame (headers + payload) —
exactly what Wireshark expects.
Captured frames include:
- Beacon frames (AP advertisements)
- Probe requests (clients searching for known networks)
- Probe responses (APs answering probes)
- Deauth / disassoc frames (when in deauth-monitor mode)
- Data frames (encrypted payload — useful for analyzing handshakes, not the actual user data)
- Management frames generally
6.5.2 Starting a capture
From the OLED:
- Wi-Fi → Sniffers → PCAP Capture.
- Pick a channel (or enable channel hopping).
- Capture starts; OLED shows packet counter incrementing.
- PUSH to stop.
From the Flipper companion FAP:
- Send Command →
sniffraw. - Watch the packet counter on the Flipper screen.
- PUSH back to stop.
The output file is named with a timestamp (e.g.
marauder_20260510_143022.pcap) on the SD card.
6.5.3 Retrieving captures
Three paths:
- Pull SD card, read on a host machine. The most reliable. Use Lexar/Kingston cards (Vol 2 § 6.1) so the host actually mounts them.
- Web Server file browser. From the SoftAP web UI (Mode 3), some Marauder builds expose a file-browser tab where you can download PCAPs directly.
- Companion FAP “Save to Flipper SD” — the FAP can mirror new captures from Game Over’s SD to the Flipper’s SD via UART. Slow (UART-bandwidth-limited) but doesn’t require pulling the card.
For long sessions, plan to pull the SD periodically — Marauder doesn’t manage rolling captures for you, and a multi-hour deauth-monitor session can fill many GB.
6.6 GPS-fed wardriving (with external GPS source)
Game Over has no internal GPS receiver. To do WiGLE-format wardriving, feed NMEA from an external GPS into the Game Over’s UART.
6.6.1 Hardware setup
External GPS sources that work:
- u-blox NEO-6M / NEO-M8N dev module — wire TX (3.3 V level) into Game Over’s RX pin on the GPIO header (find via Marauder’s pin config), GND common.
- M5Stack GPS Hat if you also have a Cardputer — same NMEA output via UART.
- A separate USB-C GPS dongle that presents NMEA on a serial port — feed via Flipper’s USB host (advanced; not all firmwares support).
Whichever source: configure for 9600 baud, 8N1, NMEA output.
6.6.2 Marauder GPS workflow
- Wire the external GPS to Game Over’s GPS input pin.
- Power up; wait for cold fix (30–90 s in clear sky).
- Wi-Fi → General → “Enable GPS” (or equivalent — varies by build).
- GPS → GPS Data to verify NMEA is parsing — should show coordinates within a minute.
- Run any Wi-Fi sniff or PCAP capture; logged entries are tagged with GPS coordinates.
- The output is a WiGLE-format CSV that you can upload directly to wigle.net.
This is operationally cumbersome compared to AWOK Dual Touch V3 (which has internal GPS + DIP-switch routing). For wardriving, AWOK is the better tool. Game Over GPS is a feature you’d reach for only if AWOK isn’t on hand.
6.7 Worked examples (concrete attack walk-throughs)
The legal/ethics framing in Vol 8 applies to all of these. Run only on networks you own or have written authorization for.
6.7.1 Wi-Fi audit of your home network
Goal: validate that your home Wi-Fi setup behaves as expected under hostile conditions.
Setup:
- Game Over standalone (OLED) or Flipper-bridged.
- Antenna installed.
- Power via USB-C.
Procedure:
- AP Scan → identify your home AP’s BSSID and channel.
- Probe Request Sniff → walk around the house with a phone associated to your AP. Watch probes from your phone and other devices.
- Targeted deauth → pick your phone’s MAC, deauth-flood for 30 s. Verify: phone disconnects and reconnects quickly (good — your network is resilient) or stays disconnected (you have a roaming / sticky-client problem).
- PMKID capture → sniff the 4-way handshake when the phone re- associates. Use later for offline crack tests against your own credentials.
6.7.2 BLE proximity-pairing spam test
Goal: see how your devices respond to BLE pairing pop-ups.
Setup:
- Game Over standalone.
- Antenna installed.
- An iPhone, Android phone, and Windows laptop nearby.
Procedure:
- BLE → Sour Apple → start.
- Watch the iPhone for AirDrop / pairing pop-ups.
- Switch to Microsoft Swift-Pair Spam → check the Windows laptop.
- Switch to Samsung Buds Spam → check the Android phone.
- Note which devices show pop-ups, how persistent they are, and how easy they are to dismiss. Useful for understanding your fleet’s exposure surface in a public-Wi-Fi context.
6.7.3 NRF24 mousejack test (with NRF24 daughter installed)
Goal: check whether any wireless mouse/keyboard you own is vulnerable.
Setup:
- NRF24 daughter installed in Game Over.
- Standalone or Flipper-bridged.
Procedure:
- NRF24 → MouseJack Scan → start.
- Wiggle a wireless mouse you want to test. Note its USB-receiver MAC if it appears.
- If it does → known-vulnerable Logitech / Microsoft / Dell receiver. Replace with a wired or Bluetooth alternative.
- If it doesn’t → the receiver is using a more secure protocol variant (newer Logitech “Secure Connect”, Bluetooth-only mice).
6.7.4 Sub-GHz audit (with CC1101 daughter installed)
Goal: check sub-GHz traffic in your environment.
Setup:
- CC1101 daughter installed with appropriate antenna (433 MHz typical for North America consumer devices).
- Standalone or Flipper-bridged.
Procedure:
- Sub-GHz → Scan → start. Sweep through 433.92 MHz / 868 MHz / 915 MHz.
- Note any active transmissions — could be your garage door, weather station, key fob, IoT sensor.
- Sub-GHz → Capture → record a transmission you control (your own garage opener, your weather station).
- Pull the capture file off the SD; analyze in Universal Radio Hacker or compare against the Flipper’s own sub-GHz capture for the same signal. (Note: Game Over’s CC1101 capture is complementary to the Flipper’s, not duplicative — useful for triangulation.)
6.8 What’s next
Vol 7 covers known issues, mitigations, and mods — including the factual investigation of the alleged Flipper-bricking issue.
Comments (0)