DSTIKE Hackheld · Volume 1
DSTIKE Hackheld Volume 1 — Overview & the DSTIKE Story
What it is, who built it, where it sits in the lineup, and how to read this twelve-volume reference
Firmware ↔ Device matrix. The Hackheld ships on Spacehuhn Deauther, but can also run the ESP8266 port of ESP32 Marauder Firmware as an alternate. (Part of the Firmware ↔ Device “runs on” matrix.)
1.1 What this device is
The DSTIKE Hackheld is a pocket-sized standalone Wi-Fi attack and audit handheld built around the Espressif ESP8266 microcontroller. It runs out of the box on Stefan Kremser (“Spacehuhn”)‘s open-source WiFi Deauther firmware — an Arduino-based codebase that turns the ESP8266 into a self-contained 802.11 packet-injection platform with a web UI, a serial CLI, and three primary attacks (deauth, beacon spam, probe spam) plus a scanner.
The hardware envelope is small and intentionally simple:
- A 0.96″ monochrome OLED for menus, scan results, and attack status.
- A cluster of tactile buttons — on the V1 board, seven of them: a 4-way navigation diamond, two labelled keys (A and B), and a dedicated reset.
- A USB-C port for charging and serial-over-USB to a host computer.
- A 1000 mAh LiPo cell for untethered field use.
- A clear-cast resin or acrylic shell exposing the distinctive purple PCB.
The device is the embodiment of an early hacker-toolbench truism: the ESP8266 is shockingly capable for what costs $3 of silicon. Spacehuhn proved it in 2017 with the original Deauther proof-of-concept; DSTIKE built the productised handheld around it. The Hackheld V1 (purple-PCB era) is the specific unit covered by this series.
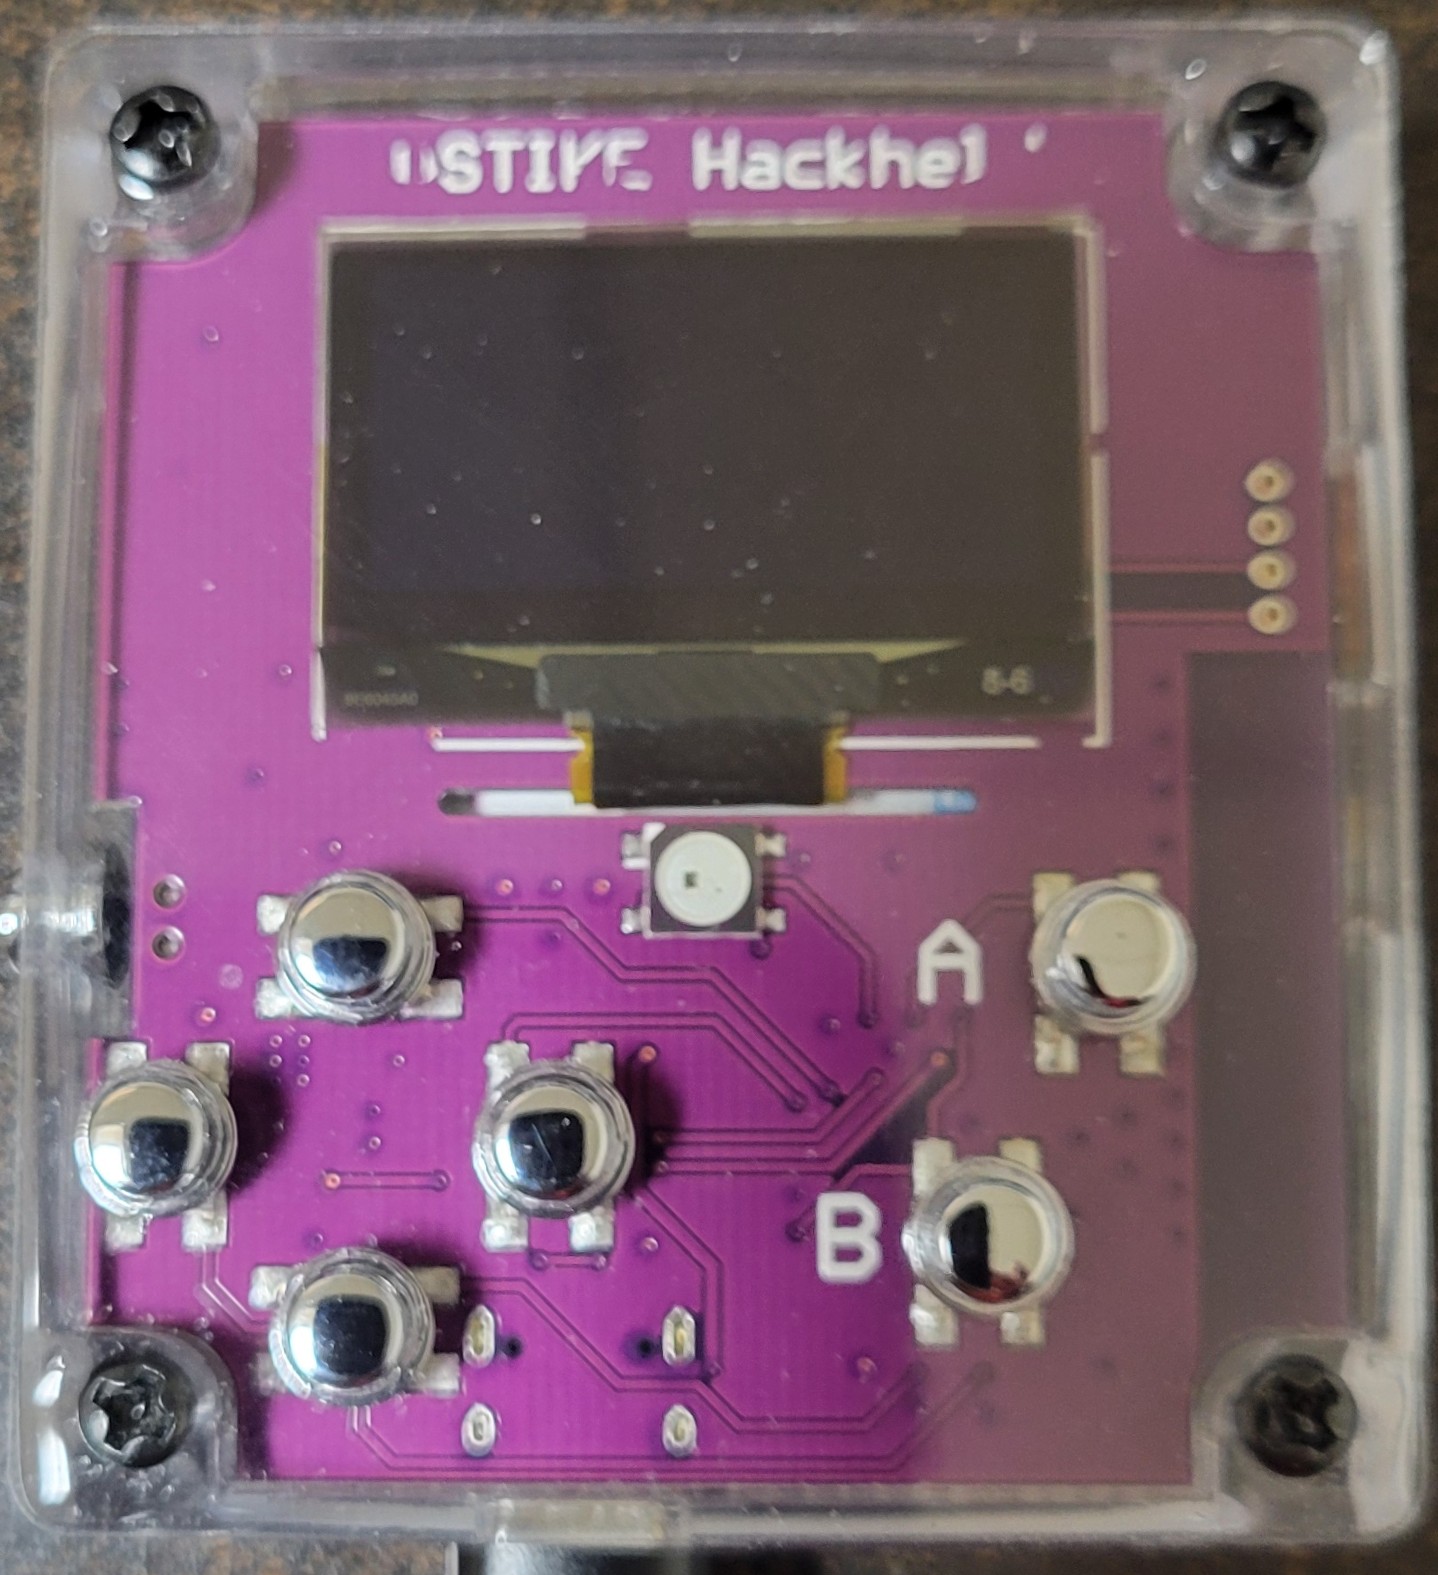
Figure 1.1 — DSTIKE Hackheld V1, front. Photo, 2026-05-15.
1.2 Who built it
DSTIKE is the trade name of Travis Lin (林晨), a Shanghai-based hardware designer who builds and sells small-batch security and tinkerer hardware out of his Tindie store (tindie.com/stores/lspoplove) and his own site (dstike.com). DSTIKE has shipped a long line of ESP8266- and ESP32-based handhelds since 2017 — the original D-duino, the early Deauther 1.x board with a 3-button cluster, the Watch wearable, several Deauther Hackheld revisions (the purple V1 being the earliest in the named-Hackheld lineage), and more recent ESP32 builds.
The DSTIKE devices are not the same as the reference Spacehuhn boards. They are productised — they ship in a case, with a battery, with the firmware pre-flashed, with appropriate antennas and PA stages built in. That last point matters: the silkscreen on the RF module reads “PA = 25 dBm”, meaningfully above the bare ESP-12-F’s ~20 dBm. The added power amplifier extends realistic working range from the bare-chip’s ~10–20 m to a more useful ~50–100 m line-of-sight (regulatory and antenna factors permitting — see Vol 12 § Legal).
1.3 The Spacehuhn lineage
The firmware the unit ships with is open-source. It descends from a multi-year project by Stefan Kremser (“Spacehuhn”), a German hacker / educator / YouTuber who released the esp8266_deauther repo in 2017 (github.com/SpacehuhnTech/esp8266_deauther, MIT-licensed). The original release was a proof-of-concept that the ESP8266’s closed-source Wi-Fi blob could in fact transmit IEEE 802.11 deauthentication and probe-request frames — a feature Espressif had not officially supported but which the community found by reverse-engineering the SDK.
The lineage of relevant Deauther releases:
Table 1 — The lineage of relevant Deauther releases
| Year | Release | What it added |
|---|---|---|
| 2017 | 1.0 — 1.6 | Original proof-of-concept; bare CLI; no web UI. The codebase that proved the ESP8266 could emit raw deauth and probe frames. |
| 2018 | 2.0 | Full rewrite. Adds the web UI (http://192.168.4.1), the scanner / attack / station / SSID page tabs, persistent storage of named target lists in SPIFFS, JSON-over-HTTP control plane. |
| 2019–2020 | 2.1 — 2.5 | Stability + display drivers + button bindings for the wide variety of DSTIKE-class handhelds that emerged. |
| 2021 | 2.6.1 | Current firmware on this unit. Mid-2021. Refinements to the AP/station scanner, more reliable probe-spam, OLED rendering improvements. |
| 2022–2024 | 2.7.x | Current line. Bug fixes, default-channel changes, Arduino-ESP8266 core 3.x compatibility. |
Spacehuhn’s repo also branched out: a Deauther fork for the ESP32 (which has independently developed into the ESP32 Marauder ecosystem — see ../ESP32 Marauder Firmware/ for the full deep dive on that branch), the ESP-Watch wearables, and a long tail of educational sub-projects (the pcap-tools repo, WiFiDuck, lolfetch, etc.). For this device, the canonical upstream is SpacehuhnTech/esp8266_deauther and the relevant branch is the master of v2.x.
1.4 The unit at a glance
Captured from the photos in 00-inventory/photos/ (Front, Back, Back-Zoomed) and from the stated firmware version:
Table 2 — Captured from the photos in [00-inventory/photos/](../../00-inventory/photos/) (Front, Back, Back-Zoomed) and from the stated firmware version
| Item | Value |
|---|---|
| Model | DSTIKE Hackheld V1 (purple PCB era) |
| RF/MCU module | DSTIKE WiFi+ ESP8266MOD with PA = 25 dBm onboard |
| Display | 0.96″ 128×64 monochrome OLED (SSD1306, I²C) |
| Buttons | 7 — 4-way navigation diamond + A + B + RESET |
| USB | USB-C — charge + serial |
| USB-to-serial IC | CH340-class (small QFN on back PCB) |
| Battery | ZON.CELL 1000 mAh 3.7 V 3.7 Wh LiPo (Standard GB/T18287) on JST PH 2-pin |
| Charge IC | TP4056-class (assumed; confirm by silk) |
| Stock firmware | Spacehuhn esp8266_deauther v2.6.1 |
| Default Wi-Fi credentials | SSID pwned, password deauther, gateway 192.168.4.1 |
| Acquired | (pending — record on next inventory update) |
| Status | active, lab unit |
Vol 3 unpacks the hardware one component at a time. Vol 4 unpacks the power / battery / USB-serial subsystems.
1.5 Where the Hackheld sits in the lineup
The Hack Tools hub has a long list of Wi-Fi-capable platforms by 2026. Where does this one fit?
Table 3 — 5. Where the Hackheld sits in the lineup
| Platform | Year of silicon | Status | Standalone? | 5 GHz? | BLE? | Notes |
|---|---|---|---|---|---|---|
| DSTIKE Hackheld V1 (this) | ESP8266 (2014) | Owned | Yes (OLED + buttons + battery) | No | No | Programmable open-source; smallest standalone Wi-Fi platform in the lineup |
| Flipper Zero WiFi Devboard | ESP32-S2 (2020) | Owned | Tethered to a Flipper, or via USB-C | No | No (BLE 4.2 only) | First-party Flipper accessory; Marauder runs here |
| AWOK Dual Touch V3 | Dual ESP32-WROOM (2017 silicon) | Owned | Mounted on a Flipper or USB-powered | No | Yes (BLE 4.2) | Touch UI + GPS + wardriving focus |
| Ruckus Game Over | ESP32-S3 (2021) | Owned | Mounted on a Flipper or its own USB-C | No | Yes (BLE 5) | OLED + joystick + sub-GHz daughter slot |
| ESP32 Marauder (firmware) | ESP32 family | Firmware only; runs on owned hardware above | n/a | No (mostly) | Yes | Stefan Kremser’s spiritual successor |
| AWOK ESP32 C5 (aspirational) | ESP32-C5 (2024) | Aspirational | TBD | Yes | Yes | Closes the 5 GHz gap |
| Wired Hatters Banshee (aspirational) | ESP32-C5 + ESP32-S3 | Aspirational | Yes | Yes | Yes | Flagship multi-MCU pentest |
The Hackheld’s unique seat at this table:
- It’s the only owned Wi-Fi platform that runs without a host. Marauder on the Flipper WiFi Devboard needs the Flipper to drive its UI. The Hackheld has its own OLED + buttons + battery. Drop it in a pocket and it operates on its own.
- It’s an open-source educational target. The Spacehuhn firmware is MIT-licensed, the Arduino-ESP8266 core is the friendliest “first embedded project” toolchain in existence, and the OLED + buttons are wired in a textbook way. The Hackheld is the write your own firmware from scratch device in the lineup — Vol 10 and 11 of this series are entirely on that.
- It’s the smallest and lowest-power. ESP8266 idle draws single-digit mA; even active TX with the PA pulls under 300 mA. A 1000 mAh LiPo carries it for an hour of attack, or far more of scan-only operation.
What it can not do:
- 5 GHz Wi-Fi (the chip is 2.4 GHz only).
- BLE (no Bluetooth radio on the ESP8266).
- Arbitrary 802.11 frame injection (only deauth / beacon / probe-request can be raw-emitted from this chip via the SDK).
- Full WPA-handshake crack (the chip can capture handshakes but doesn’t have the CPU / RAM to crack one).
For those, the lineup has other platforms — see Vol 12 § Comparison.
1.6 What this twelve-volume series covers
The full table of contents across the series:
Table 4 — The full table of contents across the series
| Vol | Topic | Why it’s there |
|---|---|---|
| 1 | Overview & DSTIKE story (you are here) | Orientation + lineage |
| 2 | The ESP8266 substrate | Chip-level: silicon, RAM, GPIO, RF, monitor mode, packet injection capabilities and limits |
| 3 | Board hardware walkthrough | Every component on the actual board, photo-driven |
| 4 | Power, battery, USB-serial | The 1000 mAh runtime envelope, charge cycle, brownout posture, CH340 enumeration |
| 5 | Spacehuhn WiFi Deauther firmware | Primary firmware deep dive: architecture, attack engines, data structures |
| 6 | Web Interface — full users guide | The main users guide — every page, every button, troubleshooting |
| 7 | CLI command reference | Every serial command, syntax, scriptable examples |
| 8 | Other firmwares | ESP8266 Marauder port, ESPurna, Tasmota, NodeMCU, ESPHome, community forks |
| 9 | Firmware update procedures | Web flasher, esptool, Arduino, recovery from brick, downgrade procedures |
| 10 | Writing your own code I — Arduino | Arduino IDE + ESP8266 core + OLED + button libs + first sketch end-to-end |
| 11 | Writing your own code II — advanced | PlatformIO, async patterns, ESPAsyncWebServer, OTA, sample apps including a Spacehuhn fork |
| 12 | Workflows, comparison, legal/ethics, cheatsheet | Operational recipes + cross-tool comparison + legal posture + laminate-ready cheatsheet |
Vols 5, 6, 10, 11 are the headline volumes (firmwares, web interface, writing your own code).
1.7 How to read this series
Three reading orders that work, depending on goal:
A — Field user (just wants to use the device). Vol 1 → Vol 5 → Vol 6 → Vol 9 (for upgrades) → Vol 12. Skip the rest until you hit something you can’t figure out.
B — Custom-code developer (wants to write firmware for the chip). Vol 1 → Vol 2 → Vol 3 → Vol 10 → Vol 11. Vol 5 and 7 are useful as the “this is what production firmware looks like” reference. Vol 9 is essential — you’ll be flashing constantly.
C — Engineer evaluating the platform (deciding whether to buy more of these, or whether to use one in a project). Vol 1 → Vol 2 → Vol 12 (comparison) → Vol 5 (capability ceiling) → Vol 11 (how custom code looks). Skip the user-guide volumes.
The series is internally cross-referenced — any volume that mentions a concept covered in detail elsewhere links to it. There is no required strict-order read.
1.8 Conventions
- All dates are absolute ISO (
2026-05-15), per the Hack Tools hub convention. - Inline code in
monospaceis exactly what to type or copy. - File paths relative to the
Hack Tools/root use forward slashes (Flipper Zero/CLAUDE.md) regardless of host OS. - Cross-tool references link by relative path so the file structure is portable (
../../Flipper Zero/CLAUDE.md). - Hex addresses are written
0x0000(lowercase x, leading zeros padded to chip-word-width where it aids reading). - Figure numbering is
Vol.Section(e.g., Figure 5.2 = Volume 5, second figure). - Photos of the unit live in
../../00-inventory/photos/. Stock photos from Wikimedia Commons live infigs/and carry verbatim credit lines per CC-BY / CC-BY-SA license. - “Verify on the bench” appears where a claim is based on documentation rather than hands-on measurement on the specific unit — these are explicit invitations to bench-check before relying on the claim in production.
1.9 What’s next
→ Vol 2 — The ESP8266 Substrate unpacks the chip. Tensilica LX106 instruction set, 80 KB DRAM memory map, GPIO multiplexing, the 2.4 GHz radio’s monitor-mode capabilities, packet-injection what-works-and-what-doesn’t. Foundation for everything else in the series.
Comments (0)