M5Stack Cardputer Zero · Volume 7
M5Stack Cardputer Zero Volume 7 — Programming & App Development (Linux)
Program it like a Raspberry Pi: native gcc/Python/Rust on Debian aarch64, plus the czdev AppBuilder + SDL2 emulator for on-screen LVGL apps
7.1 About this volume
Vol 7 covers how you write software for the Cardputer Zero. The headline: there is no firmware to flash, no sketch to upload, and no board to select. The Zero boots a real Linux OS (Raspberry Pi OS / Debian, aarch64) off its microSD card, so you develop for it exactly the way you develop for a Raspberry Pi Zero 2 W — because it is the same RP3A0 silicon (quad Cortex-A53 @ 1.0 GHz, 512 MB LPDDR2; see Vol 2). You SSH in, or use the on-device shell, and you build with native gcc/g++, python3, Rust, or anything in the Debian repositories.
Two layers matter here, and this volume separates them:
- General Linux programming — write any CLI tool, daemon, or Wayland GUI app, in any language, the same as on any Debian aarch64 machine (§3, §5).
- On-screen “app” development — the small 320×170 ST7789v3 LCD has a first-party SDK,
czdev(the CardputerZero-AppBuilder), that builds LVGL apps sized for the panel, packages them as Debian.deb, and — critically — ships an SDL2 desktop emulator so you can develop and test the LCD UI on your laptop with no hardware in hand (§4).
TIP. If you have ever written a Python script on a Raspberry Pi, you already know how to program the Cardputer Zero. Everything below §4 is “just Linux.” §4 is the only piece that is Cardputer-Zero-specific, and even that is a thin LVGL/CMake wrapper over standard Linux tooling.
Cross-references: Vol 4 covers the OS image and boot chain; Vol 6 covers the firmware/OS ecosystem and on-device app store; Vol 8 covers writing the OS image to microSD. The software-sibling Linux handhelds (Clockwork uConsole, PicoCalc) live in the peer Cyberdecks project — cross-ref those for the broader Linux-handheld comparison.
7.2 The development model — it’s a Linux box
┌──────────────────────────────────────────────────────────────┐
│  Cardputer Zero  —  development model                          │
│                                                                │
│   Your PC (macOS / Linux / Windows-MSYS2)                      │
│        │                                                       │
│        ├── SSH over Wi-Fi / Ethernet ──────────►  on-device    │
│        │                                          Debian shell │
│        │                                                       │
│        ├── czdev SDL2 emulator  ──►  renders 320×170 LCD       │
│        │     (LVGL app, no HW needed)   in a keyboard skin     │
│        │                                                       │
│        └── cross-compile (aarch64) ──►  scp .deb / binary ───► │
│              or build ON the device     dpkg -i / run          │
│                                                                │
│   No board-select. No upload step. No esptool. No flashing.    │
└──────────────────────────────────────────────────────────────┘
The mental model is a server/workstation, not a microcontroller. Three concrete consequences:
- There is no “upload.” You either build on the device, or you build on a PC and copy the artifact across (
scp, a.debover the network, or onto the microSD). Running a program is./myprogordpkg -i myapp.deb && myapp. - There is no flash/erase cycle and no bricking. A bad build is a process that exits non-zero, not a corrupted partition. Worst case you re-image the microSD (Vol 8).
- You get the whole Debian userland.
apt installpulls prebuilt aarch64 binaries — compilers, interpreters, the entire pentest toolchain (aircrack-ng, nmap, tcpdump, bettercap; see Vol 6 and the operational-posture volume Vol 11).
7.2.1 Why earlier drafts said Arduino/ESP-IDF
Why this volume changed. The 2026-05-13 research-baseline draft of this volume described Arduino IDE, a PlatformIO
[env:m5stack-cardputer-zero]block targetingesp32-s3-devkitc-1, MicroPython-for-ESP32, UiFlow, and ESP-IDF. That was a plausible-but-wrong inference, written before the product shipped, from the rest of the Cardputer family — the original Cardputer and the Cardputer ADV are genuinely ESP32-S3 devices, so a “Zero” variant was assumed to be the same silicon class. It is not. The Cardputer Zero (Kickstarter, launched 2026-05-26) is built on a Raspberry Pi Compute Module 0 and boots Linux. None of the ESP32 toolchain applies: there is no Arduino core, noplatformio.ini, noM5.Speaker/M5.Imulibrary, noWire.beginTransmissionI²C scanning, and no ESP-NOW. Those belong to its ESP32 cousins (the Cardputer ADV deep dive, which remains correct for that device). This volume is now confirmed-fact, not hypothesis. See Vol 2 for the hardware correction and Vol 6 for the firmware/OS correction.
7.3 Native toolchains on Debian aarch64
Everything you would expect on a Debian machine is one apt install away. The device is ARMv8-A / aarch64, so packages resolve to the arm64 architecture.
Table 1 — 3. Native toolchains on Debian aarch64
| Language / tool | Install | Notes |
|---|---|---|
| C / C++ | sudo apt install build-essential | gcc/g++ 12.x on Debian 12 (Bookworm). Compiles native aarch64 binaries directly. |
| Python 3 | preinstalled; sudo apt install python3-pip python3-venv | The default scripting path. pip + venv work normally. |
| Rust | sudo apt install rustc cargo or rustup | Needed for czdev itself (§4). Heavier compiles are slow on 512 MB — see §3.1. |
| Make / CMake | sudo apt install make cmake | czdev apps build under CMake. |
| Shell | preinstalled (bash, dash) | POSIX scripting works as on any Linux box. |
| Go / Node / etc. | apt install golang / nodesource | Available; mind RAM and build time. |
| Git | sudo apt install git | Clone repos directly on-device or on the PC. |
# A first native C program, built and run entirely on the device:
cat > hello.c <<'EOF'
#include <stdio.h>
int main(void){ printf("Hello from aarch64 Linux\n"); return 0; }
EOF
gcc -O2 -o hello hello.c
./hello                      # → Hello from aarch64 Linux
uname -m                     # → aarch64
No board target, no -mcu flag, no serial monitor. gcc emits an ELF binary for the SoC it is running on, and you execute it.
7.3.1 On-device vs. cross-compile
With 512 MB RAM and a quad A53 @ 1 GHz, the Zero compiles, but large builds (Rust crates, C++ template-heavy code, a kernel) are slow and can thrash. The decision:
Table 2 — With 512 MB RAM and a quad A53 @ 1 GHz, the Zero compiles, but large builds (Rust crates, C++ template-heavy code, a kernel) are slow and can thrash. The decision
| Build on-device | Cross-compile on a PC | |
|---|---|---|
| Setup | zero — toolchain is apt install away | install an aarch64-linux-gnu-* toolchain (or build in an arm64 container / qemu-user) |
| Speed | fine for scripts, small C, single files; slow for big C++/Rust | fast; uses the PC’s cores and RAM |
| Fidelity | exact target environment — no ABI surprises | must match the target’s libc/sysroot; mismatches bite at link/run time |
| Best for | scripting, quick fixes, on-site edits, single-tool builds | the czdev emulator workflow, big apps, CI, batch .deb builds |
| Transfer | none (already there) | scp the binary/.deb, or dpkg -i over the network |
NOTE. The most ergonomic loop is the czdev emulator on the PC (§4.2) for the LCD UI, then cross-build the
.debandscpit over — you never wait on the device’s CPU until the final on-hardware check. For “just Linux” CLI work, editing over SSH and building on-device is usually simplest.
7.4 The headline path: czdev (CardputerZero-AppBuilder)
For apps that draw on the 320×170 screen, the first-party path is czdev, the CLI from the m5stack/CardputerZero-AppBuilder repository. It is the closest thing the Zero has to a “Cardputer SDK,” but unlike the ESP32 family’s Arduino flow, it is a thin LVGL + CMake harness that produces ordinary Debian packages.
7.4.1 What it is
czdev is an online build system plus a local desktop toolkit for building LVGL apps sized for the LCD. Its subcommands:
Table 3 — czdev is an online build system plus a local desktop toolkit for building LVGL apps sized for the LCD. Its subcommands
| Command | Purpose |
|---|---|
czdev doctor | Check the local toolchain (CMake, SDL2, FreeType, Rust) and report what’s missing |
czdev list | List discoverable apps / examples |
czdev build | Build an app (CMake under the hood) |
czdev run | Build + launch the app in the SDL2 emulator |
czdev watch | Rebuild + relaunch on source change (hot dev loop) |
czdev deploy | Push a built app to a connected device |
czdev login / publish / unpublish | Store auth + publish/withdraw to the online app store |
czdev bump | Increment an app’s version |
The tool is written in Rust (the emulator is the Rust component); the publishing path needs only Python 3, so you can publish from a machine without the full C/SDL build stack.
7.4.2 The SDL2 desktop emulator
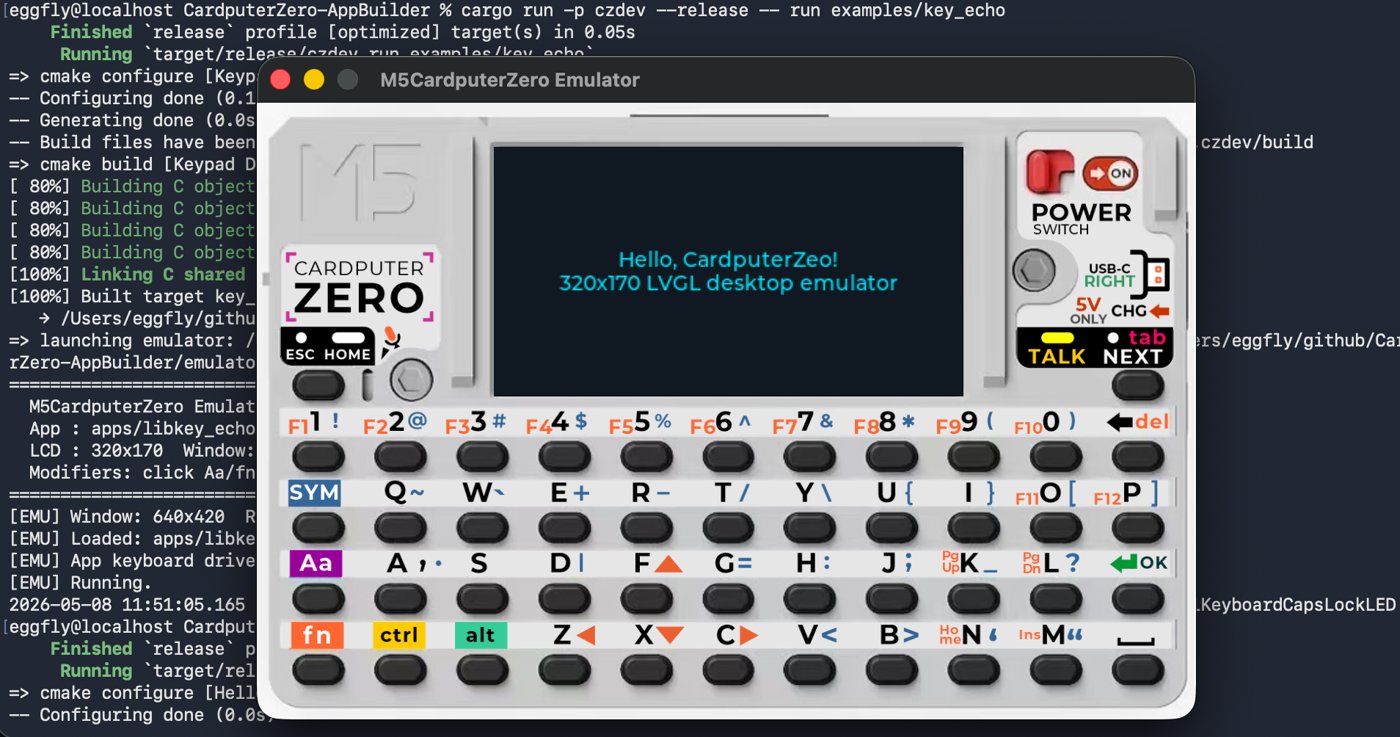
This is the feature that makes the Zero pleasant to develop for before the Kickstarter unit arrives. czdev run / czdev watch build the LVGL app for the host and render the 320×170 LCD inside a keyboard skin using SDL2, on macOS, Linux, or Windows (via MSYS2). You see the exact panel resolution, the keyboard layout, and your widget tree — no physical device required.
┌────────────────────────────────────────┐
│   czdev SDL2 emulator (host window)     │
│  ┌──────────────────────────────────┐   │
│  │  320 × 170  LVGL render surface   │   │  ← pixel-exact LCD
│  │  [ your app's widgets here ]      │   │
│  └──────────────────────────────────┘   │
│  ▦▦▦▦▦▦▦▦▦▦▦  keyboard skin  ▦▦▦▦▦▦▦▦▦  │  ← maps host keys → app events
└────────────────────────────────────────┘
TIP. Pair
czdev watchwith the emulator and you get a save-to-screen loop measured in seconds, entirely on your laptop. Only the final acceptance test needs the hardware.
7.4.3 Quickstart
Prerequisites on the host (for the emulator/build): CMake, SDL2, FreeType, and a Rust toolchain. (Publishing alone needs only Python 3.)
# Clone with submodules — the LVGL/runtime deps come in as submodules:
git clone --recursive https://github.com/m5stack/CardputerZero-AppBuilder
cd CardputerZero-AppBuilder

# 1) Verify your toolchain:
cargo run -p czdev --release -- doctor

# 2) Run the bundled example in the emulator (no device needed):
cargo run -p czdev --release -- run   examples/hello_cz

# 3) Hot-reload dev loop:
cargo run -p czdev --release -- watch examples/hello_cz
doctor tells you exactly which of CMake/SDL2/FreeType/Rust is missing and how to install it; on Debian/Ubuntu that’s sudo apt install cmake libsdl2-dev libfreetype-dev plus a Rust toolchain, on macOS the Homebrew equivalents, and on Windows the MSYS2 packages.
7.4.4 The C app ABI
A Cardputer Zero LVGL app is a small C unit against a tiny ABI — you implement two functions and the runtime drives them. The header is cz_app.h:
#include <cz_app.h>     /* the Cardputer Zero app ABI */

/* Called once at startup. `parent` is the LVGL root object for your app's
   screen — build your widget tree as children of it. */
void app_main(lv_obj_t *parent)
{
    lv_obj_t *label = lv_label_create(parent);
    lv_label_set_text(label, "Hello, Cardputer Zero!");
    lv_obj_center(label);
}

/* Called for input / lifecycle events. `type` identifies the event class;
   `data` points at the event payload (key codes, etc.). */
void app_event(int type, void *data)
{
    /* e.g. handle keyboard events, ticks, focus changes */
}
That is the whole contract: void app_main(lv_obj_t *parent) to build the UI, void app_event(int type, void *data) to react. The runtime owns the LVGL display/input drivers, the event loop, and the main(); you own the two callbacks. Because the build also runs under the SDL2 emulator, the same source renders on your laptop and on the device unchanged.
NOTE — verify on receipt. The exact
typeenumeration anddatalayouts forapp_event(key-down vs. key-up codes, tick events, etc.) should be read from the shippedcz_app.h/ examples on the hardware before you rely on specific values — this volume documents the ABI shape, not a frozen event table.
7.4.5 app-builder.json + .deb packaging
czdev discovers buildable apps by scanning a repository for an app-builder.json manifest (app id, name, entry sources, metadata). czdev build compiles the app and packages the result as a Debian .deb. That .deb installs with dpkg -i and is what the on-device AppStore and the official .deb repository serve (see Vol 6 for the distribution side). So the artifact you ship is a normal Debian package — not a firmware blob.
czdev build  myapp/                 # → myapp.deb
scp myapp.deb cardputer-zero:~      # copy to the device
ssh cardputer-zero 'sudo dpkg -i ~/myapp.deb'
7.4.6 Online “submit a Git repo → get a .deb” mode
czdev also has an online build mode: point it (or the CardputerZero Hub at cardputerzero.github.io) at a public Git repository containing an app-builder.json, and the service builds it and hands back a ready-to-install .deb — no local CMake/SDL/Rust toolchain required at all. This is the lowest-friction path for someone who only wants to ship one app, and it is what the App Store publish flow uses under the hood.
Companion repos worth knowing (full list in §8):
CardputerZero/template— an LVGL starter you copy to begin a new app.m5stack/M5Stack_Linux_Libs— the C/C++ M5Stack application-development framework for Linux (the library layer many apps build on).CardputerZero/skill— Codex/agent skills for Cardputer Zero development.
7.5 Other on-device dev paths
czdev is for LCD apps. Most of what makes the Zero useful as a Hack Tools box is plain Linux programming.
7.5.1 Plain Linux GUI (Wayland) apps
The on-device desktop shell is a small-screen Wayland environment (cardputer-zero-shell; see Vol 6). You are not limited to LVGL — any toolkit that speaks Wayland (GTK, SDL, a Wayland-native EGL app) can render on the panel, subject to the 320×170 real estate and 512 MB RAM. LVGL via czdev is recommended because it is sized and themed for the panel, but it is a recommendation, not a restriction.
7.5.2 CLI tools and scripts
The highest-value, lowest-effort path. Anything you would run headless on a Pi runs here: a bash script, a Python service, a systemd unit, a cron job. This is the path for drop-box duty, recon automation, and orchestration (see Vol 11 for posture). No UI work at all — SSH in and write the script.
7.5.3 Python + the Pi camera stack
The Full model carries the 8 MP Sony IMX219 on the CSI bus (see Vol 2). Because the Zero runs the Raspberry Pi userland, the standard Pi camera stack applies directly:
sudo apt install python3-picamera2 # libcamera-based stack# Capture a still with picamera2 (libcamera under the hood):
from picamera2 import Picamera2
cam = Picamera2()
cam.configure(cam.create_still_configuration())
cam.start()
cam.capture_file("shot.jpg")
cam.stop()libcamera tools (libcamera-hello, libcamera-still) and picamera2 both work because the IMX219 is a first-class Pi sensor. (Lite model has no camera — picamera2 will report no devices.)
7.5.4 GPIO / I²C / SPI from Linux
The Cap EXT 14-pin bus exposes SPI, UART, I²C, USB, GPIO, plus 5 V and GND (see Vol 3). Under Linux you drive these with the standard kernel interfaces — not Arduino Wire/digitalWrite:
Table 4 — The Cap EXT 14-pin bus exposes SPI, UART, I²C, USB, GPIO, plus 5 V and GND (see [Vol 3](/m5stack-cardputer-zero/vol-3/)). Under Linux you drive these with the standard kernel interfaces — not Arduino Wire/digitalWrite
| Bus | Linux interface | Userspace |
|---|---|---|
| GPIO | gpiochip character device | libgpiod (gpioget/gpioset, libgpiod Python/C bindings) |
| I²C | /dev/i2c-N (i2c-dev) | i2cdetect/i2cget (i2c-tools), smbus2 (Python) |
| SPI | /dev/spidevB.C (spidev) | spidev ioctls, spidev Python module |
| UART | /dev/ttyAMA* / /dev/ttyS* | termios, pyserial |
sudo apt install gpiod i2c-tools          # libgpiod CLI + i2c-tools
gpiodetect                                # list gpiochips
i2cdetect -y 1                            # scan I²C bus 1 (the Linux way — NOT Wire.h)
Device-tree overlays (m5stack/m5stack-linux-dtoverlays, see Vol 4) enable/route these buses; once an overlay is active the bus shows up as a standard /dev node.
7.6 Decision matrix — which path
Table 5 — 6. Decision matrix — which path
| You want to… | Use | Why |
|---|---|---|
| Put a UI on the 320×170 LCD | czdev / LVGL (§4) | Sized for the panel; emulator lets you build it with no hardware; ships a .deb |
| Develop the LCD UI before your unit ships | czdev SDL2 emulator (§4.2) | Pixel-exact panel + keyboard skin on macOS/Linux/Windows |
| Automate recon / run a pentest tool / drop-box | CLI / shell / Python (§5.2) | It’s Linux; apt install the tool and script it |
| Use the camera | Python + picamera2/libcamera (§5.3) | IMX219 is a stock Pi sensor; the Pi stack just works |
| Talk to a Cap-EXT peripheral | libgpiod / i2c-dev / spidev (§5.4) | Standard Linux device interfaces, not Arduino libs |
| Ship one app with no local toolchain | online “Git repo → .deb” (§4.6) | Server builds it; you install the .deb |
| Write a non-LVGL GUI | Wayland app (§5.1) | The shell is Wayland; any Wayland toolkit renders |
| Build big C++/Rust fast | cross-compile on a PC (§3.1) | 512 MB / quad-A53 is slow for heavy compiles |
7.7 Common Linux code patterns
Real Linux idioms for the Zero’s hardware — replacing the ESP32 Wire/M5.* patterns the old draft carried.
7.7.1 Read the BQ27220 fuel gauge (sysfs / i2c-dev)
The battery is a 3.7 V / 1500 mAh LiPo behind a TI BQ27220 fuel gauge (see Vol 5). If a kernel power-supply driver is bound, read it via sysfs; otherwise talk to it directly over I²C.
# Preferred: kernel power_supply class (if the BQ27220 driver is bound)
cat /sys/class/power_supply/*/capacity        # % state of charge
cat /sys/class/power_supply/*/voltage_now      # µV
cat /sys/class/power_supply/*/current_now      # µA (sign = charge/discharge)
# Fallback: raw I²C read of a BQ27220 standard command (e.g. Voltage = 0x08).
# Verify the bus number (i2cdetect -y N) and 7-bit address on the device.
from smbus2 import SMBus
ADDR = 0x55 # BQ27220 default 7-bit address (verify on receipt)
with SMBus(1) as bus: # /dev/i2c-1 — confirm which bus the gauge sits on
lo = bus.read_byte_data(ADDR, 0x08)
hi = bus.read_byte_data(ADDR, 0x09)
mv = (hi << 8) | lo # pack voltage (mV)
print(f"Battery: {mv} mV")NOTE — verify on receipt. The gauge’s I²C bus number and whether a
bq27xxx_batterydriver is bound by default depend on the shipped device tree/overlays; confirm withi2cdetectandls /sys/class/power_supply/on hardware before trusting either path.
7.7.2 Capture a frame from the IMX219 camera
# Grab one frame as a NumPy array for processing (Full model only):
from picamera2 import Picamera2
cam = Picamera2()
cam.configure(cam.create_preview_configuration(main={"size": (640, 480)}))
cam.start()
frame = cam.capture_array()       # HxWx3 ndarray (RGB)
cam.stop()
print(frame.shape)                # → (480, 640, 3)
7.7.3 Draw an LVGL widget (czdev app)
#include <cz_app.h>

void app_main(lv_obj_t *parent)
{
    /* A button with a label, centered on the 320×170 screen. */
    lv_obj_t *btn = lv_btn_create(parent);
    lv_obj_set_size(btn, 200, 48);
    lv_obj_center(btn);

    lv_obj_t *lbl = lv_label_create(btn);
    lv_label_set_text(lbl, "Press a key");
    lv_obj_center(lbl);
}

void app_event(int type, void *data)
{
    /* React to key events here; see the shipped examples for the
       exact `type` codes (verify on receipt). */
}
Run it on the laptop with cargo run -p czdev --release -- run myapp/ — the SDL2 emulator renders the button at the panel’s real resolution.
7.7.4 Read the keyboard as a Linux input device
The 46-key matrix keyboard presents to userspace as a standard Linux evdev input device — no M5Cardputer.Keyboard library, just /dev/input:
# pip install evdev  (or: sudo apt install python3-evdev)
from evdev import InputDevice, categorize, ecodes, list_devices

# Find the keyboard among input devices (match by name on the real unit):
dev = None
for path in list_devices():
    d = InputDevice(path)
    if "keyboard" in d.name.lower():   # confirm the exact name on hardware
        dev = d; break

for event in dev.read_loop():
    if event.type == ecodes.EV_KEY:
        k = categorize(event)
        if k.keystate == k.key_down:
            print("key:", k.keycode)
# Quick check from the shell — show input devices and watch raw events:
cat /proc/bus/input/devices # list devices + handlers
sudo evtest # interactive: pick the keyboard, see keycodesNOTE — verify on receipt. The keyboard’s device name and whether it enumerates as a single evdev node or a matrix-decoder driver depend on the shipped kernel/overlay; match by the real
namestring fromevteston hardware.
7.8 Resources
Cardputer Zero app SDK + emulator
- CardputerZero-AppBuilder (
czdevCLI + SDL2 emulator): https://github.com/m5stack/CardputerZero-AppBuilder - LVGL app starter template: https://github.com/CardputerZero/template
- M5Stack Linux C/C++ app framework: https://github.com/m5stack/M5Stack_Linux_Libs
- Cardputer Zero dev skills (Codex/agent): https://github.com/CardputerZero/skill
- CardputerZero Hub (online build + App Store): https://cardputerzero.github.io
- Official
.debrepository: https://github.com/m5stack/CardputerZeroRepository
Linux / Raspberry Pi toolchains (apply directly — same SoC as Pi Zero 2 W)
- LVGL documentation: https://docs.lvgl.io/
- libcamera / picamera2 (IMX219 camera stack): https://github.com/raspberrypi/picamera2
- libgpiod (GPIO from Linux): https://git.kernel.org/pub/scm/libs/libgpiod/libgpiod.git/about/
- i2c-tools / spidev (I²C/SPI userspace): standard Debian packages (
apt install i2c-tools) - Debian aarch64 / Raspberry Pi OS docs: https://www.raspberrypi.com/documentation/
Cross-references
- Vol 2 — SoC, RAM, display, keyboard, camera hardware.
- Vol 4 — OS image, kernel, device-tree overlays.
- Vol 6 — firmware/OS ecosystem, shell, on-device App Store +
.debdistribution. - Vol 8 — writing the OS image to microSD.
- Peer Linux handhelds: Cyberdecks (uConsole = Pi CM4, PicoCalc).
End of Vol 7. Next: Vol 8 covers writing the OS image to microSD — Raspberry Pi Imager, m5stack-imager, and dd.
Comments (0)